

A single mismatched terminal block can trigger arc faults, intermittent signal loss, or full system shutdowns — yet a 2023 Mouser Electronics survey found that nearly 40% of engineers select terminal blocks based on habit rather than application-specific analysis. Knowing how to choose the right terminal block comes down to matching five critical parameters — connection type, current rating, voltage class, wire gauge range, and environmental exposure — to the exact demands of your circuit. This guide walks you through each decision point with concrete specs, side-by-side comparisons, and a ready-to-use selection checklist so you can specify with confidence on the first try.
What Is a Terminal Block and Why Does Choosing the Right One Matter
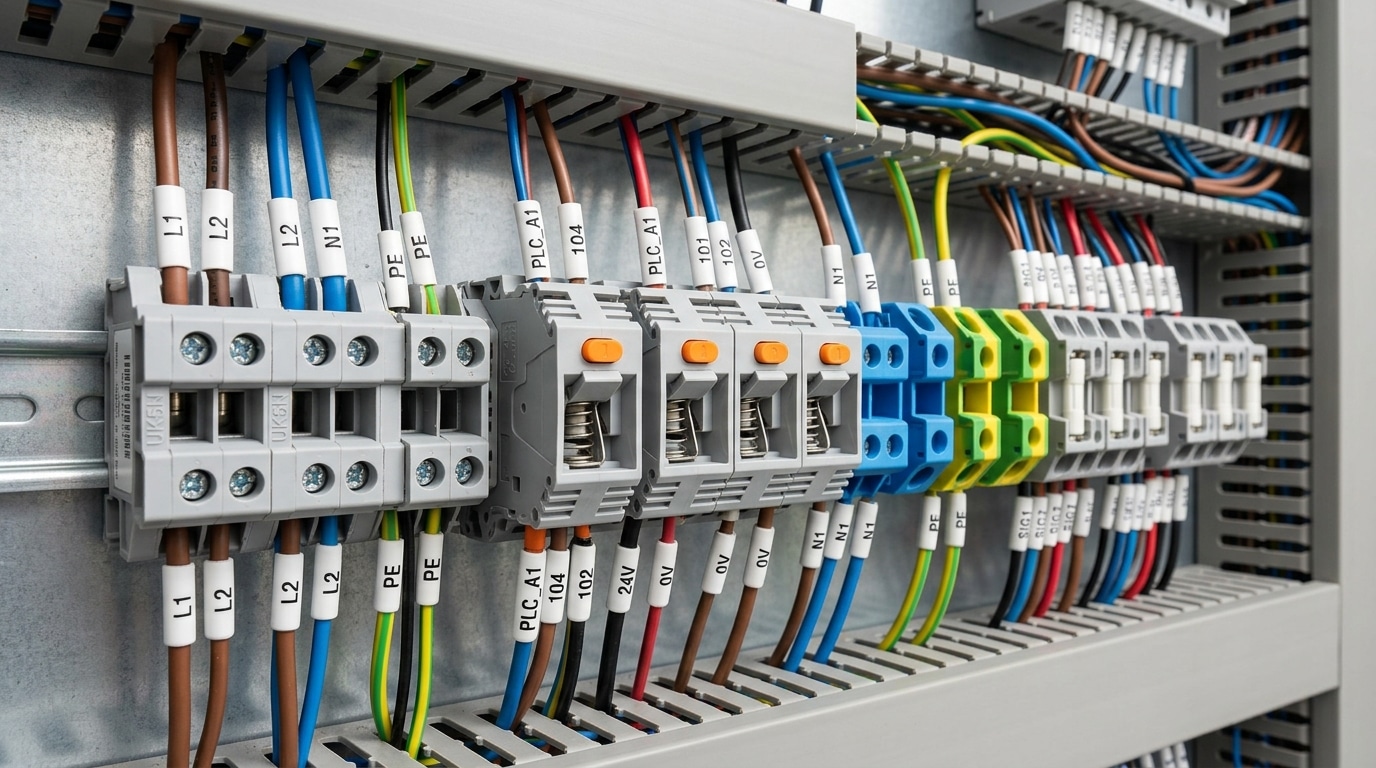
A terminal block is a modular, insulated connector that joins two or more electrical wires without splicing or soldering. Mounted on DIN rails or PCBs, these components use a clamping mechanism — screw, spring, or push-in — to secure conductors inside a housing made from materials like polyamide (nylon PA66) or ceramic. They’re the backbone of industrial control panels, building automation systems, and power distribution setups worldwide.
So why does knowing how to choose the right terminal block actually matter? Because a poor selection doesn’t just cause inconvenience — it causes failures. According to a National Fire Protection Association (NFPA) report, electrical distribution and lighting equipment accounted for an estimated 34,600 home structure fires annually between 2015 and 2019. Loose connections and undersized components are among the leading contributors.
Pick a terminal block rated for 20A when your circuit pulls 28A, and you’ll get resistive heating at the contact point. That heat degrades the insulation, increases contact resistance further, and eventually leads to arcing or complete connection failure. The damage compounds silently over months.
A terminal block isn’t just a commodity part — it’s a safety-critical junction. Choosing the right terminal block for your application means matching voltage ratings, current capacity, wire gauge compatibility, and environmental conditions simultaneously.
Getting even one parameter wrong — say, using a standard polyamide housing in an environment exceeding 120°C — can warp the block and expose live conductors. The sections ahead break down each selection factor so you can avoid these costly, dangerous mistakes.
Key Factors That Determine the Right Terminal Block for Your Application
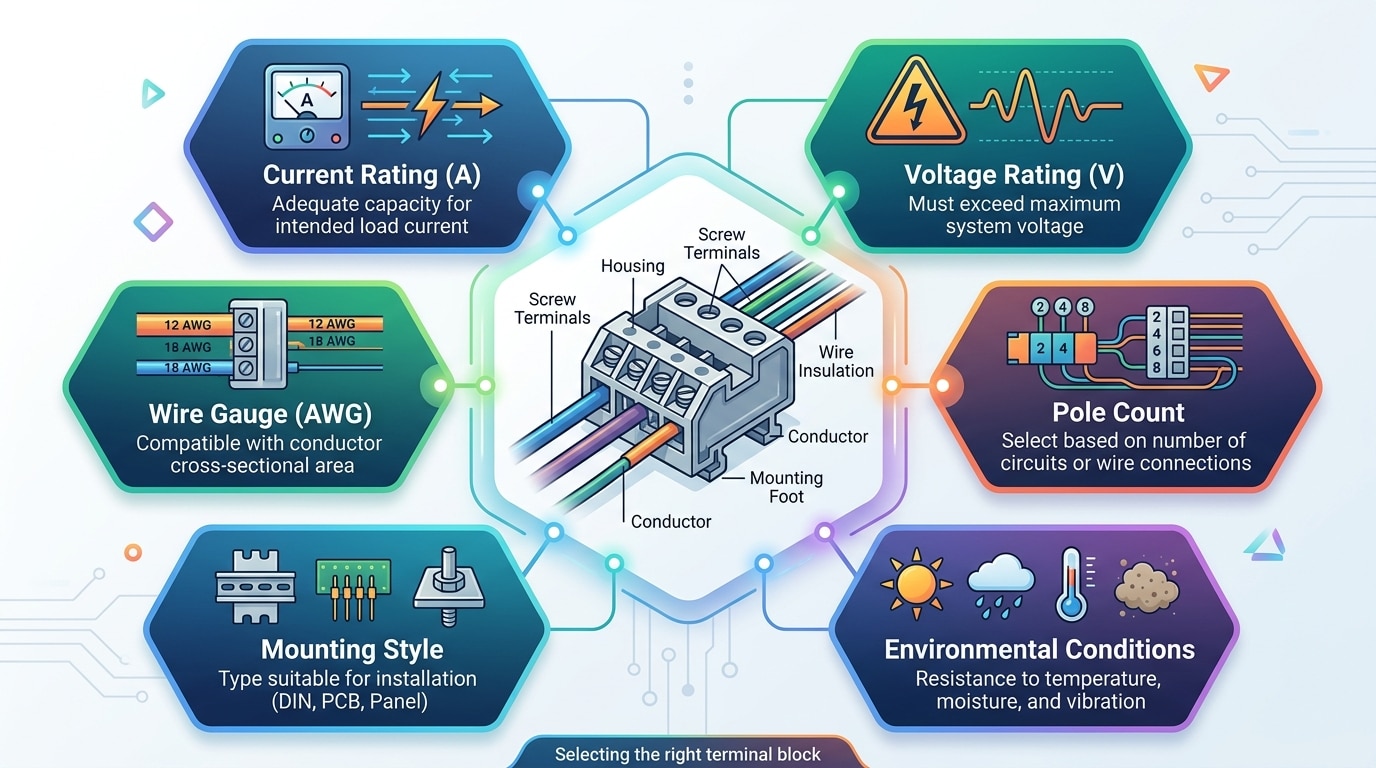
Six variables drive every terminal block decision. Miss one, and you risk undersized connections, field failures, or costly redesigns. Here’s how to evaluate each factor when figuring out how to choose the right terminal block.
Current and Voltage Ratings
Always start here. A terminal block’s current rating defines the maximum amperage it can handle continuously without exceeding its temperature rise limit — typically 30 K above ambient per UL 1059. Undersizing by even 10–15% can cause contact overheating and insulation degradation. Voltage ratings must match your system’s working voltage plus any transient spikes.
Wire Gauge Compatibility and Pole Count
Check the accepted AWG or mm² range — not just the maximum. A block rated for 12–22 AWG won’t clamp a 24 AWG conductor reliably. Pole count (the number of individual circuits in one block) determines your panel density. More poles per block means fewer DIN rail segments, but verify that spacing meets creepage and clearance requirements for your voltage class.
Mounting Style and Environmental Conditions
- DIN rail mount (35 mm) — standard for industrial panels; fastest installation and reconfiguration.
- PCB mount — soldered directly to circuit boards for compact electronics.
- Panel/chassis mount — bolt-down style for high-vibration environments like mobile equipment.
Environment seals the decision. Outdoor or washdown applications demand IP67-rated housings and corrosion-resistant contacts (tin or nickel plating over copper alloy). High-temperature zones above 105 °C require polyamide 6.6 bodies rated to at least 130 °C. Skipping environmental analysis is the fastest way to guarantee premature failure.
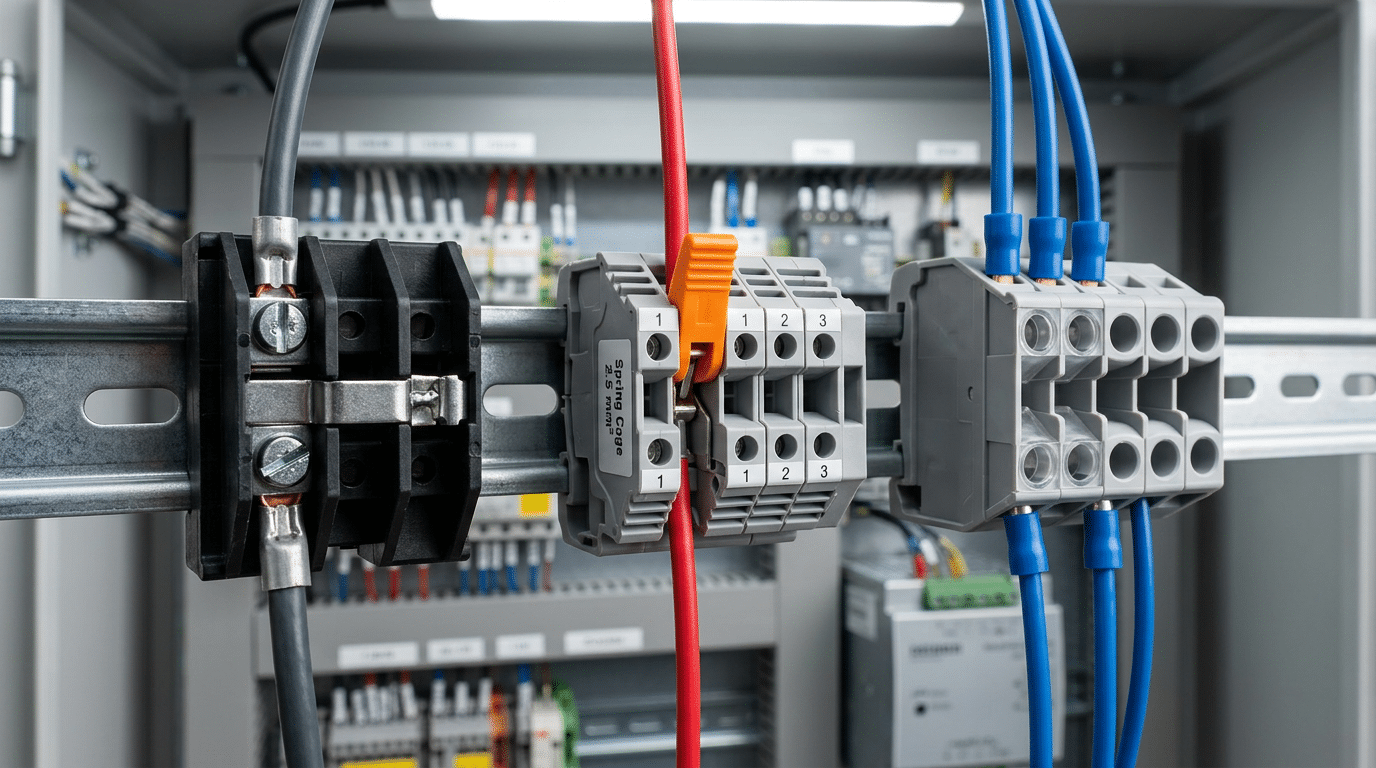
Screw Clamp vs. Spring Cage vs. Push-In — Connection Types Compared
Connection type is the single most consequential decision when figuring out how to choose the right terminal block. It dictates installation speed, long-term reliability, and maintenance burden. Here’s what actually matters across the three dominant technologies.
Screw clamp terminals deliver the highest initial holding force — often exceeding 10 N·mm torque — making them a go-to for heavy-gauge conductors. The trade-off? They loosen over time from thermal cycling and vibration, demanding periodic re-torquing. Budget roughly 30 seconds per connection during installation.
Spring cage (or tension clamp) terminals use a stainless-steel spring that maintains constant contact pressure indefinitely. Vibration resistance is excellent, which is why they dominate rail and automotive applications. No tools required for maintenance, though initial insertion needs a screwdriver to open the cage.
Push-in terminals are the fastest option — Weidmüller reports up to 50% faster wiring times compared to screw types. You simply insert a ferrule-tipped or solid conductor directly. Holding force is lower than screw clamp, so they’re best suited for fine-gauge wires (up to roughly 2.5 mm²) in low-vibration environments. For a deeper technical overview, see Wikipedia’s terminal electronics entry.
| Criteria | Screw Clamp | Spring Cage | Push-In |
|---|---|---|---|
| Holding Force | High | Medium-High | Medium |
| Vibration Resistance | Low-Medium | High | Medium |
| Installation Speed | Slow (~30 s) | Moderate (~20 s) | Fast (~15 s) |
| Re-Torquing Needed | Yes | No | No |
| Best For | High-current, thick wire | Rail, mobile machinery | Control panels, fine wire |
Pro tip: If your panel has hundreds of termination points and vibration isn’t a concern, push-in saves hours of labor. But for anything on a moving platform — choose spring cage without hesitation.
How to Match Terminal Blocks to Wire Gauge, Voltage, and Current Requirements
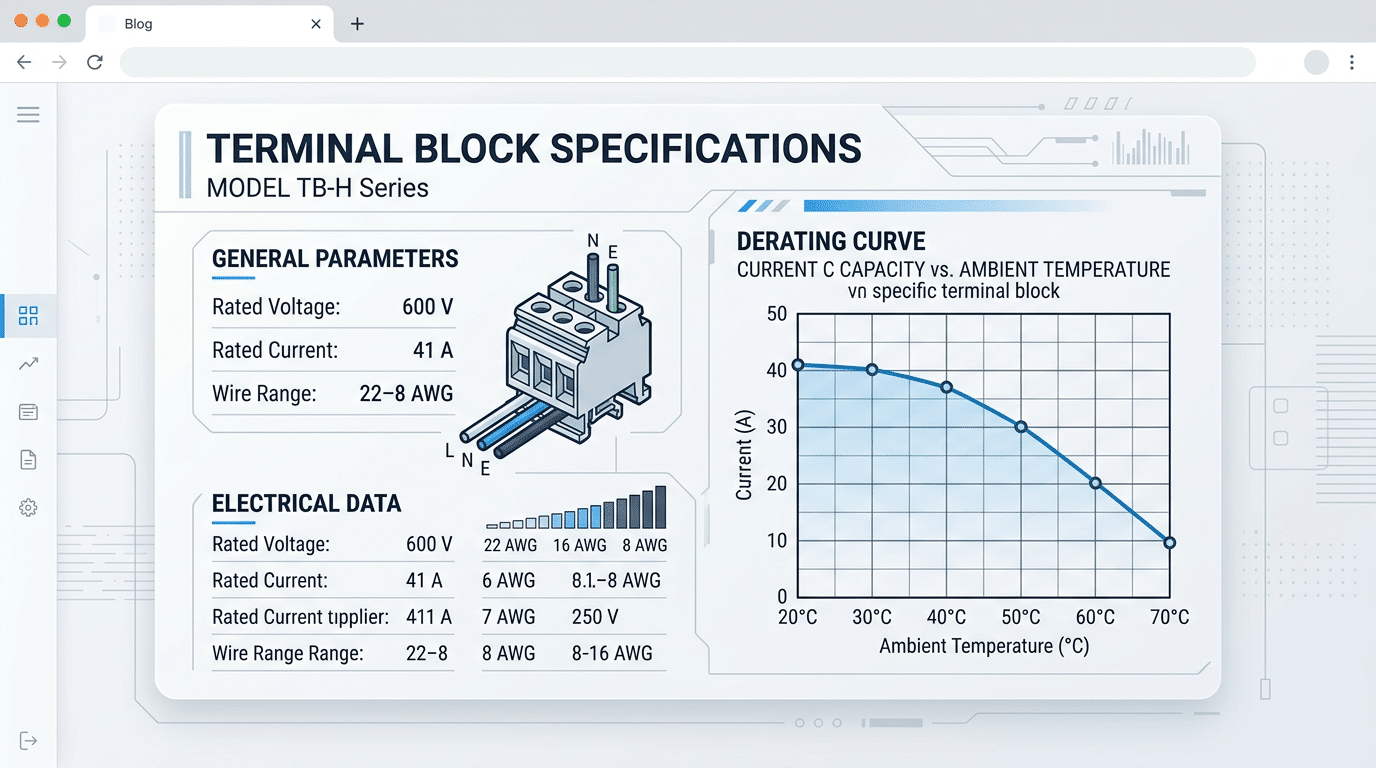
Start with the datasheet, not the catalog photo. Every terminal block lists three critical specs: rated voltage (Ue), rated current (Ie), and acceptable wire range in AWG or mm². When figuring out how to choose the right terminal block, you need to verify that all three specs exceed your circuit’s actual demands — not just match them.
Apply Derating Before You Commit
Here’s what catches engineers off guard: UL 1059 and IEC 60947-7-1 test terminal blocks under controlled lab conditions — 20°C ambient, single-level mounting, copper conductors. Stack three tiers of terminal blocks inside a sealed enclosure at 55°C, and your effective current capacity can drop by 30–40%. Always apply the manufacturer’s derating curve for your actual ambient temperature and mounting density.
A Quick Real-World Calculation
Say you’re wiring a 480V three-phase motor drawing 18A per phase with 12 AWG THHN conductors. You need a terminal block rated for at least 600V (the next standard voltage class above 480V) and a current rating that, after derating for a 45°C panel interior, still exceeds 18A. A block rated 32A at 20°C might derate to roughly 22A at 45°C — adequate, but barely. Choosing a 41A-rated block gives you genuine headroom.
Pro tip: Always match the wire stripping length to the terminal block’s contact cavity. A 2mm mismatch can reduce the effective contact area enough to cause localized hot spots under full load.
Cross-reference your conductor size against both the block’s minimum and maximum wire acceptance. Inserting a 16 AWG wire into a block designed for 8–2 AWG results in unreliable clamping force regardless of the connection type.
Choosing Terminal Blocks Based on Environment and Industry Requirements
Your operating environment will override every other specification. A terminal block rated perfectly for voltage and current still fails if it can’t survive the conditions around it. Knowing how to choose the right terminal block means matching housing material, contact plating, and IP rating to the exact stresses your application imposes.
Temperature, Moisture, and Chemical Exposure
Standard polyamide (nylon PA66) housings handle continuous temperatures up to roughly 120°C, but marine and engine-bay applications regularly exceed that. For those cases, specify ceramic or high-temperature polyamide rated to 300°C. Moisture is equally critical — terminal blocks installed outdoors or in HVAC air handlers need a minimum IP67 rating to prevent condensation-driven corrosion. Chemical plants demand housings resistant to solvents and acids; look for blocks molded from polycarbonate or PPE blends.
Industry-Specific Considerations
- Automotive: Vibration is the primary killer. Spring-cage or push-in connections outperform screw clamps because they resist loosening under constant mechanical stress.
- Renewable energy: Solar combiner boxes require blocks rated for 1,500 VDC and UV-stabilized housings. According to NFPA 70 (NEC), PV system terminal blocks must also meet specific grounding and arc-fault requirements.
- Hazardous locations: ATEX or IECEx-certified terminal blocks are mandatory in Zone 1 and Zone 2 explosive atmospheres. Non-certified blocks in these areas violate safety codes and risk catastrophic failure.
- Industrial automation: DIN-rail mounted blocks with tool-free wiring cut panel build time by up to 40%, a measurable advantage on high-volume production lines.
Pro tip: Don’t just check the terminal block’s own rating — verify that the entire assembly, including marking tags and jumpers, shares the same environmental certification. Mixed ratings create the weakest link.
Common Terminal Block Selection Mistakes and How to Avoid Them
Knowing how to choose the right terminal block is only half the battle — avoiding costly mistakes is the other half. Below are the errors that cause the most field failures, along with fixes that actually work.
Ignoring Derating Curves
Manufacturers publish current ratings at 20 °C ambient. Stack terminal blocks side by side on a crowded DIN rail inside a sealed enclosure, and that rating can drop by 30–50 %. Always consult the derating curve in the datasheet, not just the headline amperage. A 32 A block derated to 18 A at 55 °C will overheat if loaded at face value.
Overlooking Torque Specifications
Under-torqued screws cause intermittent connections; over-torqued screws crack housings. Use a calibrated torque screwdriver — not a standard flathead driven by feel. Most screw-clamp blocks specify 0.5–0.8 Nm for small gauges. The NEC (NFPA 70) requires connections be made per manufacturer torque values, and inspectors do check.
Choosing Incompatible Materials
Pairing aluminum conductors with tin-plated brass contacts invites galvanic corrosion. If your installation mixes conductor metals, specify blocks with nickel-plated or stainless-steel current bars designed for bimetallic use.
Underestimating Future Expansion
Leave at least 20 % spare positions on every DIN rail segment. Retrofitting additional blocks into a fully packed panel means re-routing cables, re-labeling, and downtime that dwarfs the cost of a few extra slots upfront. Cheap insurance, zero regret.
Terminal Block Selection Checklist — A Step-by-Step Decision Framework
Knowing how to choose the right terminal block becomes far simpler when you follow a repeatable sequence. Use this checklist in order — each step narrows options before the next one begins.
- Define electrical requirements first. Record maximum voltage, continuous current, and wire gauge range (AWG or mm²). Always apply a 20–25% derating above your nominal load.
- Select connection type. Match screw clamp, spring cage, or push-in to your installation speed, vibration profile, and maintenance access.
- Confirm environmental ratings. Check IP rating, operating temperature range, and material flammability class (UL 94 V-0 minimum for most industrial panels).
- Verify certifications. Cross-reference your target market: UL/cUL for North America, CE marking for the EU, CCC for China. Missing even one delays shipment by weeks.
- Validate physical fitment. Measure DIN rail type (TS 35 vs. TS 32), available panel width, and stacking height. A 2023 Weidmüller field survey found that 31% of terminal block returns stemmed from dimensional mismatches — not electrical failures.
- Plan for labeling and accessories. Confirm marker strip compatibility, end bracket availability, and jumper/bridge options before placing the order.
Pro tip: Build a one-page spec sheet covering steps 1–6 and circulate it to procurement, panel builders, and field technicians. Misalignment between these three groups causes more rework than any single technical error.
Print this framework, tape it inside your panel shop, and run every new project through it. Skipping steps costs time; following them costs nothing.
Frequently Asked Questions About Choosing Terminal Blocks
What’s the difference between a terminal block and a terminal strip?
A terminal strip is simply a row of terminal blocks mounted on a common housing or strip. Individual terminal blocks are single-point connectors; a terminal strip gangs multiple blocks together for convenience. The terms overlap in casual use, but spec sheets distinguish them — always confirm whether you’re ordering individual blocks or a pre-assembled strip with a fixed pole count.
When should I use DIN rail–mount vs. PCB-mount blocks?
DIN rail blocks suit control panels and industrial enclosures where field wiring changes frequently. PCB-mount blocks belong on printed circuit boards inside fixed products — think power supplies or LED drivers. If your project requires more than 3–4 wire changes over its lifetime, DIN rail wins on serviceability every time.
Can terminal blocks be reused?
Spring-cage and push-in types can typically handle 50+ insertion cycles without measurable contact degradation, according to WAGO’s push-in technology documentation. Screw-clamp blocks are also reusable, though you should inspect the clamping plate for thread wear after repeated torque cycles. Replace any block showing discoloration or deformed contacts.
How do I determine the right number of poles?
Count every conductor that needs a termination point — including neutral, ground, and any signal return lines. Then add 10–15% spare poles for future expansion. A 24-circuit control panel, for example, should spec at least 27–28 poles. Skipping spares is one of the most common mistakes when figuring out how to choose the right terminal block, and retrofitting extra poles later costs significantly more than planning ahead.
See also
Terminal Block Temperature Rating Explained (With Chart)
How to Choose Terminal Block IP Ratings for Outdoor Use
How to Pick the Ideal Terminal Block for Your Project
Quick Guide to Common Terminal Blocks in Industrial Automation
How to Read Terminal Block Specifications (With Examples)

