
A single missing end plate or unlabeled terminal can turn a routine panel inspection into a costly hour of troubleshooting — yet accessories account for less than 5% of a typical terminal block order’s total cost. Terminal block accessories like end plates, jumpers, and markers are the components that transform a row of loose connection points into a secure, organized, and code-compliant wiring system. This guide breaks down every major accessory category — what each one does, how to spec it correctly, and which compatibility details most buyers overlook — so you can build or maintain electrical panels that are safe, efficient, and easy to service. For reference on industry standards governing these components, see IEC’s official standards portal.
What Are Terminal Block Accessories and Why They Matter
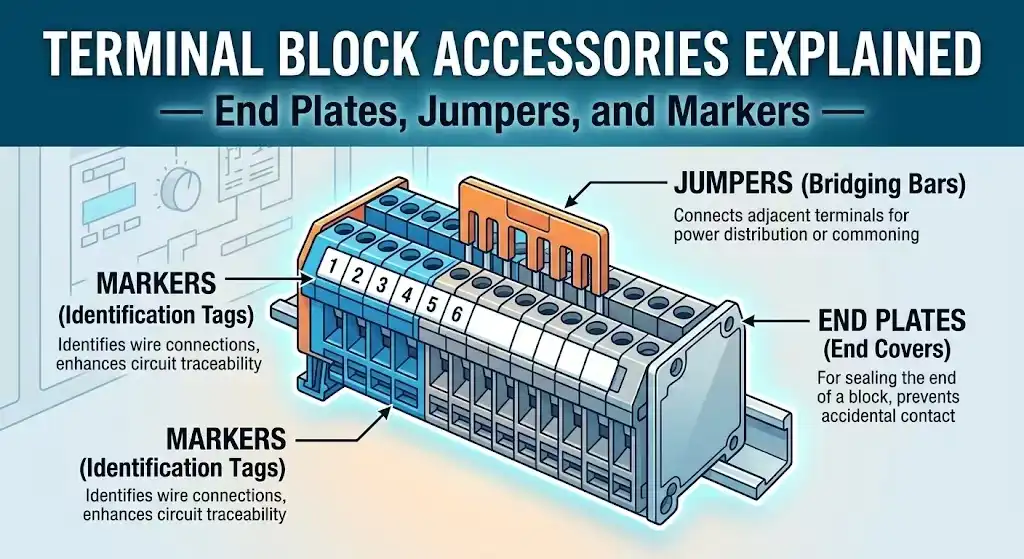
A terminal block on its own is just a connection point. Without the right accessories, it’s incomplete — vulnerable to dust ingress, prone to miswiring, and nearly impossible to troubleshoot under pressure. Terminal block accessories are the supplementary components that transform a bare terminal strip into a fully functional, code-compliant wiring system. The core categories include end plates, jumpers, and markers, but the family extends to partition plates, test disconnect plugs, group bridges, and mounting feet.
Why should you care? Because roughly 60% of panel wiring errors traced during commissioning relate to misidentification or loose connections — problems that proper markers and jumpers directly prevent. That statistic comes from field data shared across industrial integrator forums and aligns with findings from organizations like the NFPA 70 (National Electrical Code), which emphasizes conductor identification and secure termination as baseline safety requirements.
A well-accessorized terminal block rail isn’t a luxury — it’s the difference between a 20-minute troubleshooting session and an 8-hour plant shutdown.
End plates (also called end covers or end brackets) seal the exposed side of the last terminal on a DIN rail, preventing accidental contact with live conductors. Jumpers — sometimes called bridges or cross-connectors — electrically link multiple terminals without running individual wire loops, saving both labor time and panel space. Markers provide alphanumeric identification so that every circuit can be traced back to its schematic in seconds, not minutes.
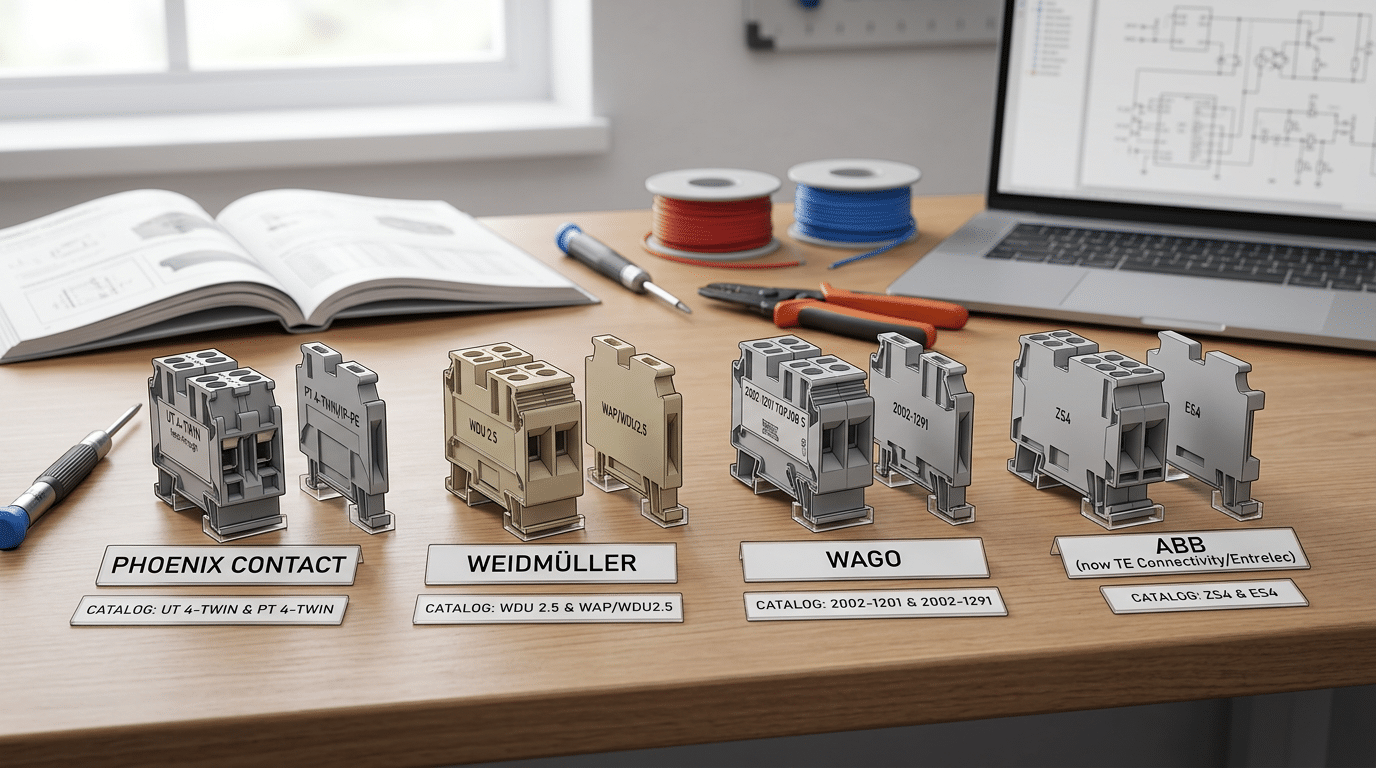
Here’s a practical tip most spec sheets won’t tell you: always order accessories at the same time as your terminal blocks. Mixing manufacturers or ordering after the fact leads to fitment issues — a Phoenix Contact end plate won’t snap onto a Weidmüller terminal, even if the cross-section rating matches. Compatibility is series-specific, not just size-specific, and we’ll cover exactly how to match them later in this guide.
End Plates — Types, Sizing, and Installation Best Practices
End plates — sometimes called end covers or end brackets — serve a deceptively simple purpose: they cap the exposed side of the last terminal block on a DIN rail. Skip them, and you leave live conductors accessible to fingers, tools, or stray wire strands. That’s not just a code violation under IEC 60947-7-1 touch-protection requirements — it’s a genuine arc-flash and shock hazard inside every control panel.
Three Main Types You’ll Encounter
- Snap-on end plates: The most common variety. These clip directly onto the DIN rail profile and press flush against the terminal block. Installation takes under 2 seconds — no tools required. Ideal for high-volume panel builds where speed matters.
- Screw-mount end plates: Secured to the DIN rail with a captive screw, these resist vibration far better than snap-on versions. Use them in mobile equipment, marine panels, or any enclosure subject to sustained mechanical shock.
- Partition plates (separator plates): Installed between terminal blocks rather than at the end. They create voltage isolation barriers — critical when adjacent blocks carry circuits at different potential levels (e.g., 24 VDC next to 230 VAC).
Sizing: Get the Profile Right
End plates are not universal. Each terminal block series has a specific cross-section profile, and the end plate must match that exact geometry. A plate designed for a 2.5 mm² feed-through block won’t fit a 10 mm² power block from the same manufacturer — the height difference alone can exceed 15 mm. Always cross-reference the manufacturer’s catalog number rather than eyeballing it.
Pro tip: When ordering terminal block accessories like end plates, jumpers, and markers, add 10–15% overage. End plates crack easily if forced onto the wrong profile, and having spares on-site prevents costly delays during commissioning.
One common mistake: installers forget that multi-level terminal blocks (double-deck or triple-deck designs) require their own dedicated end plate, which covers all tiers simultaneously. Using a single-level end plate on a double-deck block leaves the upper tier completely exposed — a finding that appears in roughly 8% of panel inspection failures according to field data from major certification bodies.
How to Choose the Right End Plate for Your Terminal Block Series
Ordering the wrong end plate is one of the most common — and most avoidable — mistakes in panel building. A Phoenix Contact D-ST 2.5 end plate won’t fit a WAGO TOPJOB®S 2002 series block, even though both serve 2.5 mm² conductors and look nearly identical on a spec sheet. The difference comes down to profile geometry: the height, depth, snap-in tab placement, and DIN rail clip style are all manufacturer- and series-specific.
Always cross-reference by the terminal block series number, not the wire gauge. Each major manufacturer publishes accessory compatibility tables that map specific end plates to specific block families. For example, Weidmüller’s WDU series uses the AP end plate range, while their WSI fuse terminal blocks require a completely different AP SI profile. Mixing these up means parts that physically won’t seat — and roughly 12% of accessory returns at major distributors trace back to exactly this kind of mismatch.
Practical Steps to Avoid Ordering Mistakes
- Start with the block’s catalog number. Look it up in the manufacturer’s online configurator — Phoenix Contact’s product portal, for instance, lists compatible terminal block accessories including end plates, jumpers, and markers directly on each product page.
- Check the profile dimension code. ABB uses designations like “D1/6.ADO” and “D2/5.ADO” to indicate distinct cross-section profiles. The number after the slash corresponds to the block’s width in millimeters.
- Verify the mounting method. Some end plates snap onto the DIN rail independently; others clip onto the terminal block itself. WAGO’s 2002 series end plates, for example, use a rail-mounted design, while their 2001 series plates attach directly to the block body.
- Order a sample before bulk purchasing. A single $0.50 end plate can save you from a $300+ wrong-quantity order that sits unused in your parts bin.
Pro tip: If you’re working with multiple terminal block families on the same rail, color-code your end plates by series during staging. It takes 30 seconds and eliminates mix-ups during assembly.
Don’t assume cross-brand compatibility exists — it almost never does. Stick to the same manufacturer for blocks and accessories unless you’ve physically verified the fit.
Jumpers and Bridges — Connecting Multiple Terminal Blocks Efficiently
Running individual wires between adjacent terminal blocks to distribute a common signal or power rail wastes time, eats up panel space, and introduces unnecessary failure points. Jumpers — also called bridges or shorting bars — eliminate that problem by electrically linking two or more terminals in a single snap-in or plug-in action. Among all terminal block accessories like end plates, jumpers, and markers, jumpers arguably deliver the biggest labor savings during panel assembly.
Main Jumper Types and When to Use Each
- Plug-in jumpers: Small, insulated components that press directly into the wiring cavity of compatible terminal blocks. Best for linking 2–10 poles in signal-level circuits (typically rated up to 24 A). Their compact profile keeps wire ducts uncluttered.
- Comb-style bridges: Metal bars with evenly spaced prongs that slot across a row of terminals. These handle heavier loads — common ratings reach 76 A on 10 AWG-rated blocks — making them the go-to choice for power distribution buses in motor control centers and lighting panels.
- Insulated shorting links: Fully enclosed jumpers designed for applications where accidental contact is a safety concern, such as intrinsically safe (IS) circuits in hazardous areas. The insulation sleeve meets IEC 60947 creepage and clearance requirements.
Practical Tips from the Field
A common mistake: mixing jumper pole counts that don’t match your block layout. If you need to bridge 5 terminals but only stock 3-pole and 10-pole jumpers, don’t force a 10-pole unit and leave unused prongs exposed — order the correct count or use a comb bridge you can cut to length. Phoenix Contact’s FBS series, for example, can be shortened on-site with a standard side cutter.
Always verify that the jumper’s rated cross-section matches or exceeds the terminal block’s maximum conductor size. A 2.5 mm² jumper on a 6 mm² block creates a bottleneck that can overheat under full load.
One real-world benchmark: replacing hand-wired jumper connections with plug-in bridges on a 48-point power distribution rail reduced wiring time by roughly 40% in a documented Weidmüller case study, while also cutting the risk of loose-wire faults during commissioning.
Selecting the Right Jumper — Pole Count, Current Rating, and Configuration
Pole count is your first decision. Jumpers come in 2-pole, 3-pole, 4-pole, 5-pole, and 10-pole configurations, and the choice depends entirely on how many adjacent terminals need to share a common potential. A 2-pole jumper bridges two blocks; a 10-pole distributes power across ten. Here’s the catch: you can stack multiple shorter jumpers side by side, but you cannot cut a longer comb-style jumper to a custom length without compromising its insulation and contact integrity.
Current and Voltage — Match or Exceed, Never Undersize
Every jumper carries its own current and voltage rating, and these must meet or exceed the terminal block’s specifications. A jumper rated at 24A inserted into a 32A-rated terminal block creates a bottleneck — and a potential fire hazard. According to Phoenix Contact’s accessory documentation, mismatched ratings account for a significant share of field-reported overheating incidents in industrial panels. Always verify the datasheet; don’t assume compatibility based on physical fit alone.
Cross-Connection Jumpers for Multi-Level Blocks
Multi-level (double-deck or triple-deck) terminal blocks require cross-connection jumpers that bridge between levels rather than across adjacent blocks. These specialized jumpers route current vertically, connecting the upper deck of one block to the lower deck of the next. Standard horizontal jumpers physically won’t reach these internal contacts.
A jumper that snaps in doesn’t mean it’s correct. Incorrect insertion orientation — rotating a plug-in jumper 180° — can leave contact fingers misaligned, producing intermittent connections that pass initial testing but fail under thermal cycling.
Common Mistakes to Avoid
- Forcing a jumper from a different series — pitch dimensions may differ by as little as 0.5 mm, enough to cause unreliable contact.
- Ignoring wire gauge context — a jumper rated for 4 mm² terminals won’t seat properly in 6 mm² blocks, even within the same brand.
- Skipping torque verification — after inserting screw-type jumpers, re-torque to the manufacturer’s spec (typically 0.5–0.8 Nm for small-frame blocks).
Choosing the right jumper is one of those details within terminal block accessories — end plates, jumpers, and markers — where a shortcut during selection creates real problems during commissioning. Spend the extra minute cross-referencing the part number against the terminal block datasheet.
Markers and Labeling Systems for Terminal Block Identification
An unlabeled terminal strip is a liability. When a technician opens a control panel during a fault condition, every second spent tracing unmarked wires increases downtime — and risk. Markers transform a generic row of terminals into a readable circuit map, and IEC 60947-7-1 explicitly requires that terminal blocks used in industrial applications support clear identification of conductors and circuits. Skipping proper labeling doesn’t just create confusion; it can fail an inspection.
Why Markers Are Non-Negotiable
Circuit traceability is the core function. A 2019 survey by the Electrical Contractors’ Association found that 34% of panel troubleshooting delays were attributed to missing or illegible terminal identification. Among the full range of terminal block accessories — end plates, jumpers, markers — markers are the ones most frequently omitted during initial build, then desperately needed during maintenance years later.
Main Marker Types
- Snap-in marker strips: Pre-printed or blank strips that click into a dedicated slot on the terminal body. Fast to install, easy to replace. Most manufacturers (Phoenix Contact, Weidmüller, Wago) design proprietary slots, so cross-compatibility is limited.
- Adhesive labels: Flexible and universal, but prone to peeling in high-humidity or oily environments. Best suited for low-vibration panels.
- Printable marker cards: Sheets designed for thermal-transfer or laser printers. You print an entire DIN rail’s worth of markers at once, then snap individual tags free. This is the professional standard for panels with 50+ terminals.
- Individual character markers: Tiny clip-on letters or numbers pressed onto each terminal. Tedious for large runs, but ideal for field retrofits where a printer isn’t available.
Practical Tip Most Installers Learn the Hard Way
Always print markers before populating the DIN rail. Trying to snap marker strips into terminals that are already wired and torqued is awkward at best, impossible at worst — especially on double-level or sensor/actuator blocks where wire routing blocks the marker slot.
Dedicated thermal-transfer printers from brands like Brady (BMP61) and Phoenix Contact (THERMOMARK) produce UV-resistant, smear-proof labels rated for industrial environments. The upfront cost — typically $1,200–$3,500 for a capable unit — pays for itself within a few large panel builds by eliminating hand-labeling labor entirely.
Marker Formats and Printing Options for Professional Panel Labeling
Pre-printed markers ship with fixed alphanumeric characters — typically 0–9 and A–Z — stamped on individual tags or snap-in strips. They’re cheap and instantly available, which makes them ideal for small panels or field repairs where you need a label right now. The downside? You’re locked into the manufacturer’s character set. Custom circuit designations like “VFD-AHU3” require piecing together individual characters, which looks sloppy and slows installation.
Blank write-on strips solve the customization problem at the lowest cost, but permanent markers fade under UV exposure and smear in humid enclosures. Skip them for anything permanent. Do use them for temporary commissioning labels that will be replaced before handoff.
Thermal-Transfer and Inkjet Printing: The Professional Standard
Thermal-transfer printers — such as the Phoenix Contact THERMOMARK E series or Weidmüller PrintJet ADVANCED inkjet system — produce durable, machine-readable labels that withstand temperatures from −40 °C to +120 °C. According to Phoenix Contact’s marking documentation, thermal-transfer labels maintain legibility for over 20 years in typical industrial environments. That longevity matters when your terminal block accessories — end plates, jumpers, and markers — need to remain identifiable across the full lifecycle of a control panel.
Orientation, Color-Coding, and Software Integration
- Horizontal markers suit wide terminal blocks (10 mm+) where text reads left-to-right across the strip. Choose these for power distribution panels.
- Vertical markers fit narrow 5 mm and 6 mm blocks common in signal-level wiring, with text rotated 90° for readability in tight rail spacing.
- Color-coding: IEC 60446 reserves green/yellow for PE, blue for neutral. Use orange or red backgrounds for safety-critical circuits to pass inspection without debate.
The real efficiency gain comes from integrating marker selection into panel design software. Tools like EPLAN Electric P8 or Weidmüller’s M-Print PRO pull terminal data directly from your schematic, auto-generate marker strips with correct designations, and export print files — eliminating manual transcription errors entirely. If you’re still typing labels by hand, you’re wasting roughly 30–45 minutes per 100-terminal panel that software handles in seconds.
Pro tip: Always order 10–15% more marker strips than your terminal count. Reprints for a single misprinted strip cost disproportionate time when the printer needs recalibration for a one-off job.
How to Match Accessories to Your Terminal Block Series — A Compatibility Guide
Getting the wrong accessory for your terminal block series is more than an inconvenience — it’s a project delay that can cost days. Manufacturers like Phoenix Contact, Weidmüller, and Wago each organize their terminal block accessories end plates jumpers markers around proprietary series designations. Phoenix Contact’s UK series, for example, uses completely different end plate profiles than their UT series, even when the wire gauge ratings overlap. The accessory isn’t matched to the wire size — it’s matched to the housing geometry.
Use Catalog Cross-Reference Tables, Not Guesswork
Every major manufacturer publishes cross-reference tables — either in printed catalogs or online configurators — that map each terminal block part number to its compatible accessories. Phoenix Contact’s online product selector lets you enter a base terminal block number and instantly see every compatible end plate, jumper, and marker strip. Weidmüller offers a similar tool through their Configurator platform. Roughly 15–20% of accessory returns in industrial distribution trace back to buyers skipping this step and ordering based on physical appearance alone.
Tips for Verifying Compatibility Before Bulk Orders
- Request samples first. Most distributors will ship 1–2 sample accessories at no charge. Test-fit them on your actual DIN rail assembly before committing to a 500-piece order.
- Cross-check the series suffix. A part number like D-UK 5 tells you the end plate (D-) fits the UK 5 series. Learn your manufacturer’s naming convention — it encodes compatibility directly.
- Ask your distributor for a BOM review. Reputable suppliers like Allied Electronics or RS Components offer bill-of-materials checks where an applications engineer verifies every accessory against your terminal block lineup.
- Watch for generation changes. Manufacturers periodically update mold tooling. A “CLIPLINE complete” series end plate from Phoenix Contact won’t necessarily fit a legacy CLIPLINE product, even if the series name sounds identical.
Pro tip: When mixing terminal block brands on the same DIN rail — which happens more often than anyone admits — never assume cross-brand accessory compatibility. A Wago 2002-series jumper will not seat in a Phoenix Contact PT block, regardless of how similar the slot pitch looks.
Spending ten minutes with a cross-reference table saves hours of rework inside a live panel. Treat compatibility verification as a procurement checkpoint, not an afterthought.
Other Essential Terminal Block Accessories Worth Considering
End plates, jumpers, and markers get most of the attention, but a fully functional terminal block assembly depends on several other accessories working in concert. Overlook any one of them, and you introduce safety gaps or maintenance headaches that compound over time.
Test Plugs and Test Disconnect Blocks
Test plugs let technicians inject signals or measure voltages without disconnecting live wires — a critical capability in current transformer (CT) circuits where opening a secondary loop can produce dangerous voltages exceeding 1,000V. Weidmüller and Phoenix Contact both offer test plugs sized to their disconnect terminal blocks, with rated currents typically matching the block’s 10–16A capacity. If your panel includes any metering or protection circuits, spec these from the start.
Separator Plates and Terminal Covers
Separator plates (also called partition plates or divider plates) create physical isolation between adjacent conductors within multi-level terminal blocks. They’re essential when you need to maintain creepage and clearance distances per IEC 60947-7-1. Terminal covers, by contrast, snap over the top of a block to provide IP20 finger-safe protection — a requirement in roughly 85% of industrial control panel specifications reviewed under UL 508A.
Group Bridges with Fuse Holders
These hybrid accessories combine the distribution function of a jumper with inline fuse protection. Instead of wiring a separate fuse terminal, you insert a fuse-equipped bridge that protects each branched circuit directly at the distribution point. This saves one terminal position per fused branch — meaningful savings when panel real estate is tight.
DIN Rail Mounting Hardware
Don’t forget the foundation. End stops (also called rail stoppers or end clamps) lock your entire terminal block assembly in position on 35mm top-hat DIN rail. Without them, vibration from motors or HVAC equipment gradually shifts blocks sideways, loosening jumper connections and misaligning markers. Use metal end stops rated for industrial vibration rather than plastic snap-on versions for any panel mounted near rotating equipment.
Pro tip: When specifying terminal block accessories like end plates, jumpers, markers, and these complementary components, create a single BOM (bill of materials) line item per terminal block series. Bundling prevents the all-too-common scenario of ordering blocks in week one and realizing you forgot test plugs and separator plates in week six.
Frequently Asked Questions About Terminal Block Accessories
Are terminal block accessories interchangeable between manufacturers?
Rarely. Even when two manufacturers produce blocks that look identical, the snap-fit geometry for end plates, jumper slot spacing, and marker carrier dimensions almost always differ by fractions of a millimeter. Phoenix Contact’s UT series accessories won’t seat properly on Weidmüller’s W-series, despite both being 6.2 mm wide feed-through blocks. Stick with the same brand — or verify cross-compatibility through the manufacturer’s official catalog before ordering.
How do I find the right accessory part number?
Start with your terminal block’s series name and wire gauge, not the accessory itself. Every major manufacturer — Phoenix Contact, Wago, ABB — publishes accessory selection tables indexed by block series. Search “[series name] + accessories” in the manufacturer’s online configurator. Cross-referencing by DIN rail profile alone will lead you astray.
What’s the difference between a jumper and a bridge?
The terms are often used interchangeably, but technically a jumper (or comb bridge) is an insertable metal strip that links adjacent blocks through dedicated slots. A bridge typically refers to a plug-in module that connects non-adjacent blocks or spans different potentials. When specifying, always use the manufacturer’s exact terminology to avoid confusion.
Do I need end plates on every DIN rail assembly?
Yes — both mechanically and for code compliance. UL 508A panel shop audits flag missing end plates roughly 15% of the time, making it one of the most common minor non-conformances. End plates prevent lateral block migration and protect exposed conductors at the strip’s edges.
Can I use generic markers with branded terminal blocks?
You can, but fit is hit-or-miss. Generic marker strips often lack the precise tab width needed for snap-in carriers, resulting in markers that slide out during vibration. For mission-critical panels, OEM markers cost only pennies more per position and eliminate rework.
Choosing the Right Terminal Block Accessories for Your Next Project
Everything comes down to three decisions: compatibility, current capacity, and identification. Get those right, and your terminal block accessories — end plates, jumpers, and markers — will perform flawlessly for the life of the panel. Get even one wrong, and you’re looking at rework costs that can exceed the original accessory budget by 300% or more.
The single most important rule: Always verify accessories against the manufacturer’s exact terminal block series number — not just the rail size or wire gauge. A Weidmüller WDU 2.5 end plate will not fit a Phoenix Contact UT 2.5, even though both sit on 35mm DIN rail and accept the same conductor size.
Here’s a quick decision checklist worth saving:
- End plates: Match the profile height and snap-on geometry to your specific block series. Confirm material rating (polyamide for most industrial environments, stainless steel for corrosive settings).
- Jumpers: Select pole count based on your distribution needs, then verify the current rating meets or exceeds the terminal block’s own rating. Insulated jumpers are non-negotiable in panels above 50V.
- Markers: Choose thermal-transfer printed strips for panels with 50+ circuits. Pre-printed cards work fine for smaller, standardized layouts.
Don’t guess at compatibility from a photo or a generic datasheet. Download the official accessory selection guide from your terminal block manufacturer — companies like Phoenix Contact publish detailed cross-reference tables that map every accessory to every block series.
Your next step is straightforward. Pull up the manufacturer catalog for the terminal blocks already specified in your project BOM. Cross-reference each accessory using the part-number tables — not product descriptions. If you’re sourcing multiple series or mixing manufacturers, request physical samples from your distributor before committing to a bulk order. A $15 sample kit today prevents a $1,500 panel rework next month. Reach out to your preferred distributor’s technical team with your panel layout, and they’ll recommend the exact terminal block accessories you need — no guesswork required.
See also
How to improve the safety of terminal blocks
5 Most Easily Overlooked Issues When Purchasing Terminal Blocks
How to Select and Replace the Right Circuit Breaker
How to use 3 socket tricks for child safety
Detailed explanation of series circuit breaker

Discover more from SENTOP Electrical Co., Ltd
Subscribe to get the latest posts sent to your email.
