
You want to connect your 12V solar panel system the right way, right? First, make sure all your panels have the same ratings. Check if your charge controller can handle the voltage or current. Use the correct connectors and safe wiring. This helps your system work well. Look at this table—solar panel fires happen more than you might think:
| Time Period | Number of Solar Panel Fires |
|---|---|
| January – July 2023 | 66 |
| 2019 | 63 |
Some common problems are grounding issues, broken connectors, and bad terminations. Always plan for what your system needs before you start.
Key Takeaways
- Always pick solar panels with the same voltage and current. This helps your system work well and stops energy loss.
- Use series wiring if you need more voltage. But if one panel is shaded, all panels are affected. Bypass diodes can help fix this problem.
- Pick parallel wiring to keep voltage steady and raise current. If one panel is shaded, the others still work.
- Follow safety rules when you connect panels. Use the right connectors, fuses, and tools. This keeps you safe and your system strong.
- Use parallel wiring if you want to add more panels later. This way, you can add panels without big changes to your system.
Series vs. Parallel Wiring
When you build your 12V solar panel system, you must pick how to wire the panels. You can use series, parallel, or sometimes both. Each way changes how your system works. Let’s look at what happens with each setup and why matching your panels is important.
Series Connection
In a series connection, you link the positive end of one panel to the negative end of the next. This setup adds up the voltage from each panel. The current stays the same as just one panel. For example, if you connect three 12V solar panels, each with 5 amps, you get 36V and 5A.
| Number of Panels | Total Voltage Output | Current Output |
|---|---|---|
| 1 | 12V | 5A |
| 2 | 24V | 5A |
| 3 | 36V | 5A |
Tip: Series wiring is good if you need higher voltage for your inverter or charge controller. But if one panel is shaded, the whole group can lose power. Bypass diodes help with this, but you should still keep panels out of shade.
Parallel Connection
With parallel wiring, you connect all the positive ends together and all the negative ends together. The voltage stays at 12V, but the current adds up. So, if you have three panels at 12V and 5A each, you get 12V and 15A total.
| Wiring Type | Voltage Output | Current Output |
|---|---|---|
| Series | Voltage adds up | Current stays same |
| Parallel | Voltage stays same | Current adds up |
Parallel wiring is good if you want low voltage and more current. If one panel is shaded or stops working, the others still work. This makes your system more reliable, especially if you expect some shade during the day.
Key Differences
Here’s a quick look at how series and parallel wiring are different:
| Wiring Type | Voltage Management | Current Management | System Design Implications |
|---|---|---|---|
| Series | Voltage adds up, increasing total system voltage | Current remains the same | Good for high voltage needs, but sensitive to shading |
| Parallel | Voltage remains the same | Current adds up, improving redundancy | Stable, lets panels work independently if one fails |
- In series, the voltage goes up, but the current is set by the lowest panel.
- In parallel, the current goes up, but the voltage is set by the lowest panel.
- Using different brands or models is not smart. Your system will only work as well as the weakest panel. This can waste energy and lower your power output.
Note: Always use panels with matching voltage and current ratings. If you mix panels, your system will run at the level of the lowest-rated panel, so you get less power.
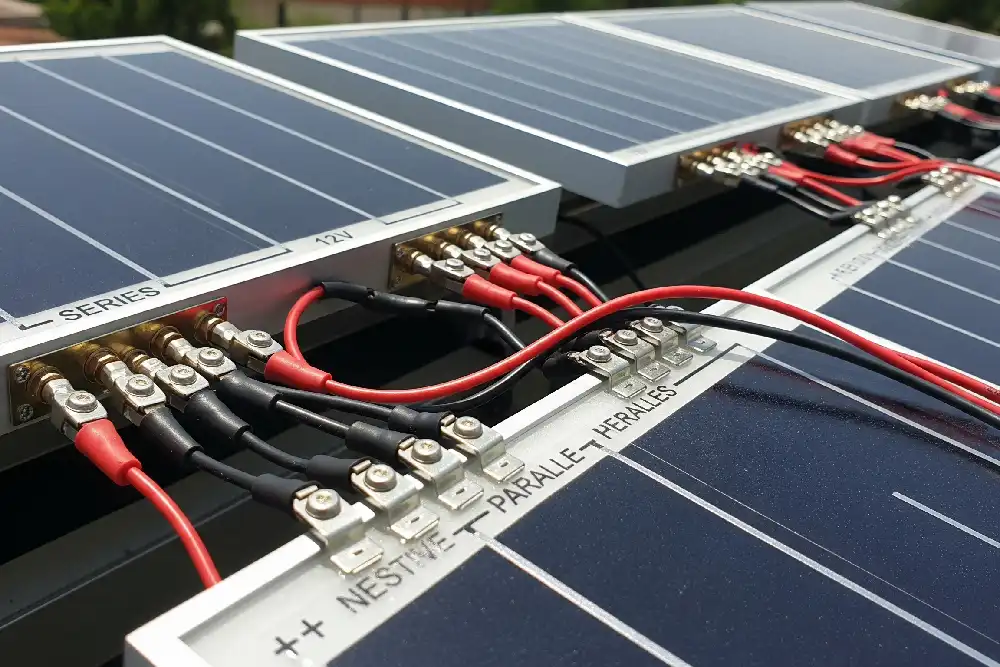
12V Solar Panel Series Wiring
When you wire your 12V solar panels in series, the voltage goes up. This can help your system work with some charge controllers or inverters. Here are the steps, safety rules, and tools you need.
Steps
Here is how you connect your 12V solar panels in series:
- Gather your materials.
You need 12V solar panels, MC4 connectors, PV wire, insulation tape, wire cutters, wire strippers, and a voltage tester. - Set up the panels.
Put your panels where they get lots of sunlight. Make sure they face the sun at a good angle. - Identify the terminals.
Find the positive and negative terminals on each panel. - Connect the panels in series.
Connect the positive terminal of one panel to the negative terminal of the next. Do this for all your panels until they are all connected. - Secure and insulate the connections.
Cover each connection with insulation tape or cable glands to keep them safe. - Connect to your charge controller or inverter.
Take the free positive terminal from the first panel and the free negative terminal from the last panel. Connect these to your charge controller or inverter. - Test your system.
Use a voltage tester to check the total voltage. Make sure it matches what you should get from your series setup. - Finalize the installation.
Make sure all wires and connections are tight and secure.
Tip: Always check that each 12V solar panel has the same current rating. The total voltage from your series string must be less than the highest voltage your charge controller or inverter can take. If you go over, you might break your equipment.
Safety Tips
Be careful when working with solar panels. Here are some safety tips:
- Learn how your solar panels work and what dangers they have.
- Know how to turn off your system fast if needed.
- If you are not sure, ask a solar technician for help.
- Follow local electrical rules and industry standards.
- Wear PPE like gloves, a helmet, and a protective suit.
- Use a safety rope if you are working on a roof.
⚠️ Warning: If you skip safety steps, you could get shocked, start a fire, or break your 12V solar panel system. Always make safety your top priority.
Equipment
Here is a table of what you need for a safe series connection:
| Component Type | Description |
|---|---|
| Connectors | MC4 connectors are the most used for series wiring. |
| Cables | PV wire (TUV PV Wire or EN 50618 standard) is good for rooftops. USE-2 cable is good for underground. |
| Tools | You need a crimping tool, solar connector tool, wire strippers, cutters, and a multimeter for testing. |
| PPE | Helmet, insulated gloves, protective suit, and safety rope. |
| Mounting Tools | Drill, wrenches, screwdrivers, level, tape measure, panel clamps, ratchets, and sockets. |
- Always use MC4 connectors to keep your connections safe from weather.
- PV wire is best for outside because it can handle sun and rain.
- A multimeter or voltage tester helps you check your work and stay safe.
Note: In the U.S., the highest voltage for solar strings is 600V. Most 12V solar panel systems are much lower, but always check your charge controller’s voltage limit before you connect everything.
12V Solar Panel Parallel Wiring
Wiring your 12V solar panel system in parallel is a great way to boost current while keeping voltage steady. This setup works well if you want to add more panels later or if you have some shade on your roof. Let’s walk through the steps, safety tips, and the gear you’ll need.
Steps
You can wire your 12V solar panels in parallel by following these steps:
- Check your charge controller’s current rating.
Look at your charge controller’s manual. Find out the maximum input current it can handle. For example, a PWM controller might handle up to 20A, while an MPPT controller can go up to 40A or even 60A. - Plan your layout and gather materials.
Place your panels where they get the most sun. Make sure you have MC4 Y connectors, PV wire, inline fuses, and a DC circuit breaker. You’ll also need tools like wire strippers and a multimeter. - Connect the panels using Y connectors.
Join all the positive wires from each 12V solar panel together using a branch (Y) connector. Do the same for all the negative wires. Double-check the polarity before moving on. - Install fuses on each positive lead.
Put an inline fuse (usually 15A for a 100W panel) on the positive wire from each panel. This protects your system if one panel has a problem. - Combine the outputs and connect to the charge controller.
Take the combined positive and negative wires and connect them to your charge controller. Use a DC circuit breaker for extra safety. - Test your system.
Use a multimeter to check the voltage and current. The voltage should stay at 12V, but the current will add up from each panel.
Tip: Always add up the short-circuit current (Isc) from each panel. For example, if each panel has an Isc of 5.8A and you use two panels, your total is 11.6A. Add a 25% safety margin for real-world conditions. Make sure you never go over your charge controller’s current limit.
Safety Tips
Parallel wiring can handle a lot of current. That means you need to be extra careful. Here are some safety tips to keep you safe:
- Use thick cables (10-12 AWG) to handle the higher current.
- Install a fuse on each panel’s positive wire.
- Wear insulated gloves and use insulated tools.
- Make sure all connections are tight and clean.
- Check your system often for loose wires or hot spots.
- Never mix panels with different voltages or brands.
- Always follow the National Electrical Code (NEC), especially Article 690 for solar systems.
- If you’re not sure, ask a certified electrician for help.
⚡ Alert: Short circuits can happen if you mix up the wires. Overcharged batteries or loose connections can cause fires or even explosions. Always double-check your work and use the right safety gear.
Equipment
You need the right equipment to wire your 12V solar panel system in parallel. Here’s a table to help you pick the best gear:
| Item | Details |
|---|---|
| Y Connectors | Rated for at least 30A, IP67 waterproof, UL/IEC/TUV certified, copper/tin-plated contacts |
| PV Wire | 10-12 AWG, sunlight and weather resistant, TUV/EN 50618 standard |
| Inline Fuses | 15A for 100W panels, one per panel, UL listed |
| Charge Controller | Check max input current (see chart above) |
| Circuit Breaker | DC rated, matches total system current |
| Tools | Wire strippers, crimpers, multimeter, insulated screwdriver |
| PPE | Insulated gloves, safety glasses, helmet |
Note: Always use certified connectors and fuses. Look for UL, TUV, or CE marks. This helps keep your system safe and up to code.
You should also know about the main electrical codes. The National Electrical Code (NEC) Article 690 covers solar panel systems. It requires rapid shutdown features and proper grounding. Always follow these rules to keep your home and family safe.
Choosing the Right Wiring Method
Pros and Cons
You want your solar system to work well for a long time. The way you wire your panels changes how your system works. Series and parallel wiring each have good and bad points. Look at this table to compare them:
| Aspect | Series Wiring Advantages | Series Wiring Disadvantages | Parallel Wiring Advantages | Parallel Wiring Disadvantages |
|---|---|---|---|---|
| Efficiency | Higher voltage means less power lost in wires | If one panel is shaded, all lose power | Each panel works alone, so shade is less of a problem | More power lost because voltage is lower |
| Cost | Usually costs less to set up | Might need more parts to fix shade problems | Works well with microinverters, but costs more | Current can get uneven and lower how well it works |
| Maintenance | Fewer parts make it easy to check | Shade makes fixing harder | You can fix one panel without stopping the rest | More parts mean more things to look after |
If your roof has shade, parallel wiring is better. In series, one shaded panel makes all panels lose power. In parallel, the other panels keep making power.
- With series wiring, shade on one panel lowers power for all.
- With parallel wiring, shaded panels do not stop the others.
Compatibility
You must match your wiring to your charge controller and inverter. Here is what you should check:
| Compatibility Factor | Description |
|---|---|
| Voltage Compatibility | Make sure your panels fit the inverter’s voltage needs. |
| MPPT Compatibility | Your inverter should get the most power from your panels. |
| Efficiency and Power Rating | Match the panel and inverter ratings for best results. |
| Communication Capabilities | Some systems let you watch and control panels, so check for this feature. |
Series wiring makes voltage go up. Your charge controller and inverter must be able to handle it. Parallel wiring keeps voltage low, so it fits most off-grid systems.
Expansion
Do you want to add more panels later? You need to plan ahead. Parallel wiring makes it easy to add more panels. This is good if your roof faces different ways or has shade. You can add new panels without changing everything.
- Pick parallel wiring when:
- You put panels on different roof areas.
- You want a low-voltage system like 12V solar panels.
- You use microinverters or DC optimizers.
- You expect shade during the day.
Parallel wiring keeps your system safe and easy to change. You can add more panels as you need them. Just remember to balance your strings and check for uneven current.
Safety Checklist
Mistakes to Avoid
You want your solar setup to be safe and work well. Many people make easy mistakes that cause big trouble. Here is a table that lists the most common mistakes and what can go wrong:
| Mistake | Consequence |
|---|---|
| Incorrect Grounding and Bonding | Electrical shocks or damaged equipment |
| Inverter Connection Errors | System failure or grid instability |
| Neglecting Overcurrent Protection | Equipment damage from too much current |
| Ignoring Local Electrical Codes | Legal trouble or failed inspections |
| Inadequate Labeling and Documentation | Harder maintenance and slower emergency response |
| Incorrect String Sizing/Voltage Mismatch | Poor performance or inverter damage |
| Poor Cable Management and Protection | Short circuits or fire risk |
Tip: Always ground your system. Use the right fuses and follow local rules. Label every wire and keep your papers close. If you size your strings wrong or mix up voltages, your 12V solar panel system might not work. It could even break.
Quick Checklist
Before you finish, use this checklist. It helps you find small problems before they get worse:
- Check all wires for the right rating and sunlight safety.
- Make sure overcurrent protection is at least 156% of the panel’s short-circuit current.
- Set your charge controller for the correct battery and voltage.
- Lock open all disconnects and check warning signs.
- Make sure all grounding wires are the right size and attached well.
- Keep gloves and eye protection nearby.
- Only use UL-listed or certified gear.
- Double-check your setup meets local codes and permit rules.
- Look at cable management—no loose or bare wires.
- Test the system with a multimeter before turning it on.
🛡️ Note: If you use this checklist, you lower your risk of shock, fire, or system problems. If you are not sure, ask a licensed electrician or solar expert for help.
You have learned how to connect your 12V solar panel system safely. Always make sure your panels have the same ratings. Check your equipment before you begin. Use the safety checklist each time you work. It helps you find dangers and keeps people safe. It also helps you follow safety rules and stay out of trouble. You can lower the chance of electrical problems or fire. Think about what you might need later. If you plan for upgrades and system changes, it is easier to add new parts. This helps protect the money you spend on your solar system.
FAQ
How do I know if my solar panels are compatible for series or parallel wiring?
Check the voltage and current ratings on each panel’s label. You want all panels to match. If you mix different types, your system will not work well. Always use panels from the same brand and model for best results.
Can I mix old and new solar panels in my system?
You should avoid mixing old and new panels. Different ages can mean different power outputs. If you mix them, your system may lose efficiency. Try to use panels with similar ratings and ages for the best performance.
What happens if I connect the wires incorrectly?
If you connect wires the wrong way, your system might not work or could get damaged. You could even cause a short circuit or fire. Always double-check your connections before turning on your system. Use a multimeter to test.
Do I need a fuse for each solar panel in parallel?
Yes, you should use a fuse for each panel in parallel. Fuses protect your system from too much current. If one panel has a problem, the fuse will break the circuit and keep the rest of your system safe.
Can I expand my solar system later?
You can add more panels later, especially with parallel wiring. Just make sure your charge controller and wires can handle the extra current. Always check your equipment’s limits before adding new panels.
See also
How to connect solar panels to 12 volt batteries and inverters
Series and Parallel Surge Protection Devices Explained for Homeowners
DC 1000V three in one out solar series connection box
What is string solar inverter and how does it work
Detailed explanation of series circuit breaker

