
You need to calculate the tripping time of the circuit breaker to understand how long it takes for the breaker to trip. This is essential for keeping your electrical system safe and functioning properly. By understanding trip curves, you can make smarter decisions to protect motors and prevent issues that cause downtime.
- Calculating the tripping time of the circuit breaker allows you to select the right breaker for each application by matching trip curves to how components heat up. It’s also important to distinguish between cold-state and hot-state performance.
- This calculation helps protect motors from phase loss and unbalanced conditions, which can damage them.
Knowing the type of circuit breaker and the fault current enables you to accurately calculate the tripping time of the circuit breaker and interpret tripping times correctly.
Key Takeaways
- Trip curves show how circuit breakers act with different currents. They help you know when the breaker will trip if there is a problem.
- Total tripping time has relaying time, breaker opening time, and arcing time. All these times are important for system safety.
- To find tripping time, first know your breaker type. Next, find the fault current. Then use the right trip curve. Read the time from the graph.
- Adjustable breaker settings can change tripping times. Always check and write down these settings before you do the math.
- Do not make mistakes by using the wrong trip curve. Think about things like temperature. Test breakers often to make sure they work right.
Trip Curves and Tripping Time

What Is a Trip Curve?
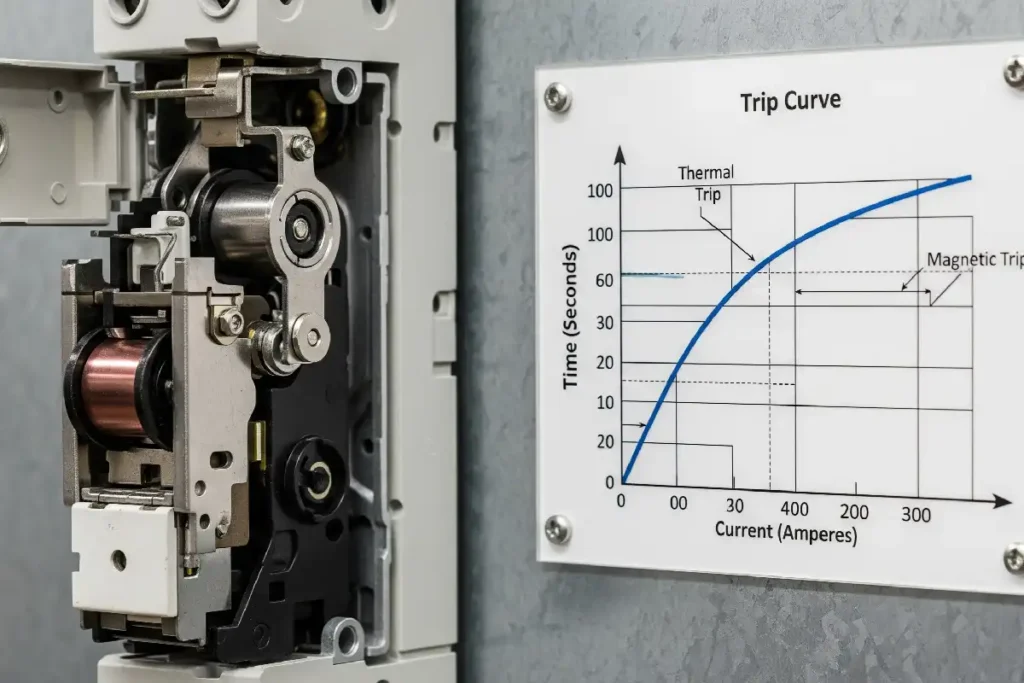
Trip curves help you see how a circuit breaker acts with different current levels. A trip curve is a graph. It shows how fault current and tripping time are connected. If the current goes above the rated value, the curve shows how fast the circuit breaker will trip. When fault current is higher, the tripping time gets shorter. You find the tripping time by looking at where the fault current meets the curve.
Trip curves have two main parts: thermal and magnetic. The thermal part deals with slow overloads. The magnetic part reacts to quick short circuits. This setup helps protect your system from both slow and fast problems.
Here is a table that lists the main trip curve types and what they are used for:
| Trip Curve Type | Trip Range (times rated current) | Typical Application / Load Type |
|---|---|---|
| B Curve | 3-5 times | Resistive loads, lighting, electronics |
| C Curve | 6-10 times | Loads with small inrush current |
| D Curve | 10-15 times | Loads with high inrush current |
| K Curve | Similar to D; thermal trip 6-350s at 2x rated current | Motor applications |
| Z Curve | Not detailed | Specialized uses |
Tripping Time Components
To figure out tripping time, you need to look at a few steps in how the circuit breaker works. The total tripping time has relaying time, breaker opening time, and arcing time.
- Relaying time is how long it takes for the relay to spot a fault and send a trip signal. This is usually about half a cycle.
- Breaker opening time starts when the trip coil gets the signal. The contacts begin to open, and arcing starts.
- Arcing time is the time from when the contacts open until the current stops at the next zero crossing. This is usually 0.5 to 0.75 cycles.
Here is a table that shows these timing parts:
| Timing Component | Description |
|---|---|
| Relaying Time | Time for relay to detect fault and send trip command |
| Breaker Opening Time | Mechanical time from trip signal to contact separation |
| Arcing Time | Time from contact separation until current interruption |
You add up these times to get the total tripping time. This total time matters for protection coordination and for lowering damage during faults.
Calculate the Tripping Time of the Circuit Breaker
To figure out the tripping time, you need to follow some steps. Each step helps you see how the circuit breaker works. You will learn how to pick the breaker type, find the fault current, use the trip curve, and read the tripping time.
Identify Circuit Breaker Type
First, you need to know what kind of circuit breaker you have. This is important because each breaker acts differently. Here is an easy way to check your breaker:
- Find the circuit breaker panel. It is often in a basement, utility room, or garage.
- Look for labels or marks. Check for the maker, model, amps, and voltage.
- Look at the switch handle color and marks. GFCIs and AFCIs have test and reset buttons.
- If there are no labels, use a multimeter. Set it to AC voltage or current. Put the leads on the breaker terminals.
- Go to the maker’s website or read the manual for more info.
- Check how the breaker is mounted. It could be panel mount, DIN rail, surface, or plug-in.
- Learn the differences between breaker types. Standard breakers trip on overloads. GFCIs protect against ground faults. AFCIs find arc faults and often have purple handles.
- Look for labels like ‘GFCI’, ‘AFCI’, ‘SWD’, or ‘HACR’ to be sure.
- Always stay safe and make sure the breaker matches the panel brand.
Tip: Knowing the right breaker type helps you pick the right trip curve and keeps your system safe.
Find the Fault Current
You need to find out the fault current in your circuit. Fault current is the current that flows when there is a problem, like a short circuit. This number is needed to figure out the tripping time. Here are some ways to find fault current:
- List all current sources. These can be generators, motors, or the utility.
- Do a short circuit study. Focus on the worst case, like a three-phase fault.
- Think about motors. Motors can give a lot of current for a short time.
- To make it simple, assume all generators run at normal voltage.
- Figure out the highest fault current at the transformer. Use the nameplate and math with kVA, voltage, and impedance.
- Make your guess better by thinking about wire size and length.
- Compare wire size to fault graphs. This helps you pick the right device.
- Compare fault current to fuse or breaker curves. This helps you choose the best protection.
You can also use these steps:
- Get the system voltage, wire constant, and wire length.
- Use these to find a multiplier.
- Multiply this by the fault current at the transformer. This gives the fault current at your spot.
Note: You can lower fault current by using longer cables, current limiting reactors, or current limiting devices.
Use the Trip Curve
After you know the breaker type and fault current, you need to use the trip curve. Trip curves show how the breaker reacts to different currents over time. You can find trip curves in datasheets or technical guides. Most trip curves use a log-log scale. The X-axis is current, and the Y-axis is time.
- Trip curves from the maker show how current and tripping time are linked.
- You can find curves for thermal overload, short-time, instant, and ground fault trips.
- Curves have notes about allowed changes and the breaker model.
- Electronic trip units act like thermal and magnetic parts and may have settings you can change.
- When you have more than one breaker, use these curves to make sure only the closest breaker trips.
Tip: Always use trip curve data from the maker. Their websites and support give the best info.
Here is a table that shows trip curve features for different breaker types:
| MCB Type | Trip Current Multiple (Magnetic Trip) | Typical Application | Trip Curve Characteristics |
|---|---|---|---|
| Type B | 3 to 5 times rated current | Household, resistive loads | Trips fast at low overloads, sensitive to small overloads |
| Type C | 5 to 10 times rated current | Commercial/industrial | Standard curve for medium inrush currents |
| Type D | 10 to 20 times rated current | Industrial, motors | Trips slower to let big inrush currents pass |
| Type K | Around 10 times rated current | Motor applications | Stops false trips when motors start |
| Type Z | 2 to 3 times rated current | Sensitive electronics | Trips very fast to protect delicate devices |
Read the Tripping Time
Now you need to read the tripping time from the trip curve. This step tells you how long the breaker takes to trip at a certain fault current. Trip curves use a log-log scale, so both axes use multiples. Here is how to do it:
- Find the fault current on the X-axis.
- Draw a line up to the trip curve.
- From there, draw a line to the Y-axis.
- The Y-axis shows the tripping time in seconds or milliseconds.
- If your fault current is between two points, guess the time between them.
A trip curve graph helps you know how long a breaker will take to trip with different overloads. For example, a breaker may handle 150% of its rated current for a long time, but trip very fast at much higher currents.
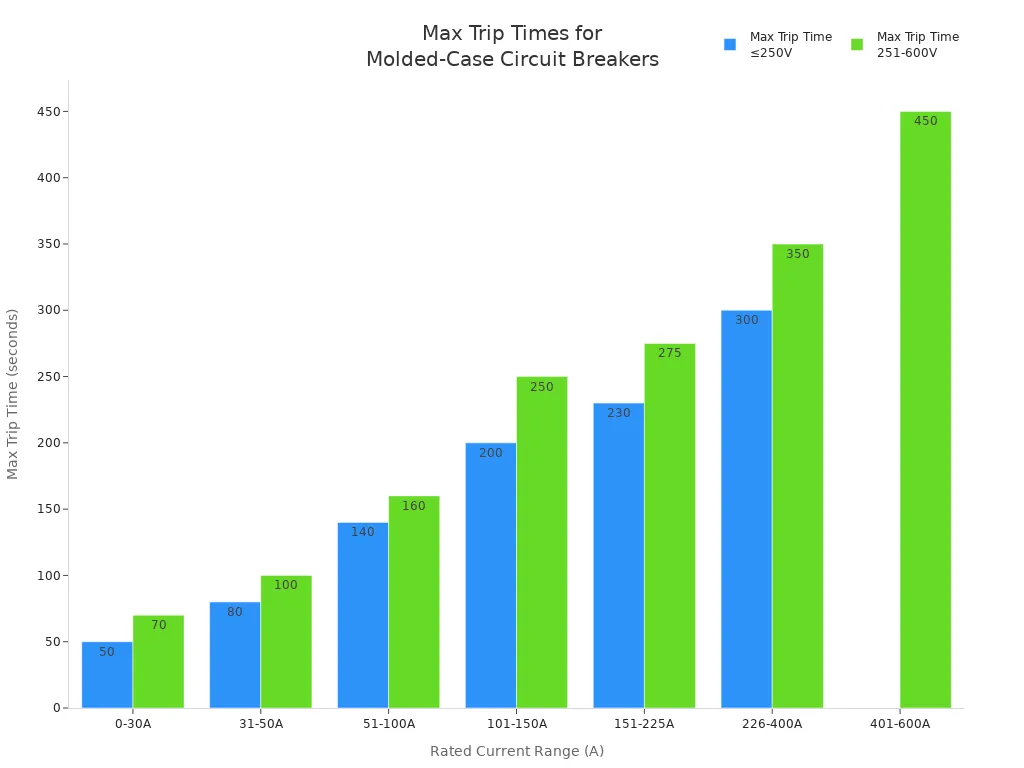
Note: Rules like IEC 60898-1 and IEC 60947-2 set trip time limits for home and industrial breakers. These rules say the longest trip times allowed to keep things safe.
Adjustable Settings and Circuit Breaker Operation
Some breakers let you change settings that affect tripping time. You can change things like continuous amps, long-time delay, short-time pickup, short-time delay, instant pickup, and ground fault pickup. These settings change the trip curve and how the breaker acts during faults.
| Setting Name | Effect on Tripping Time Calculation | Adjustment Range / Example |
|---|---|---|
| Continuous Amps (Ir) | Sets the main current the breaker can carry without tripping, which affects when tripping starts. | Can be set from 20% to 100% of the rating. Example: 1000A breaker set to 80% = 800A continuous amps. |
| Long-Time Delay | Delays tripping to let short inrush currents pass, making the tripping time longer at lower currents. | Can be set from 2.2 to 27 seconds at 6x Ir. |
| Short-Time Pickup | Sets the current for short trips, helping with selective tripping and working with other devices. | Can be set from 1.5 to 10 times Ir. Example: 1000A frame can trip from 1500A to 10,000A. |
| Short-Time Delay | Controls how long before a short-time trip happens, helping with device coordination. | Fixed time: 0.05 to 0.5 seconds; I2T ramp: 0.18 to 0.45 seconds. |
| Instantaneous Pickup | Sets the current for instant tripping, skipping other settings at high faults. | Can be set from 2 to 40 times Ir. Example: 10x Ir = 10,000A instant trip for 1000A breaker. |
| Ground Fault Pickup | Sets the ground fault current level and adds time delays to help with ground faults. | Can be set from 20% to 70% of max breaker rating; time delays of 0.1s, 0.2s, or 0.4s can be picked. |
Tip: Always check and write down the settings before you figure out the tripping time. These settings can change how fast the breaker works and affect safety.
By following these steps, you can figure out the tripping time of the circuit breaker. You will make your system safer and keep your circuit breaker working well.
Example Calculation

Sample Data
You can figure out the tripping time by using real trip curve data and fault current numbers. Most circuit breaker makers give trip curves that show how the breaker works with different currents. These curves use rated current multiples and show tripping time on a log scale. For example, if you have a Type C breaker rated at 20 amps, the trip curve might show that at 2.25 times the rated current (45 amps), the tripping time is about 10 seconds. At higher multiples, like 7 to 15 times the rated current, the breaker trips much faster—sometimes in less than a second. The energy sent to the breaker, called i²t, helps you see how quickly the breaker will act.
Here is a table with common tripping ranges for different circuit breaker types:
| Circuit Breaker Type | Current Multiple for Tripping | Typical Tripping Time Range (seconds) | Typical Application/Notes |
|---|---|---|---|
| Type B | 3 to 5 times | 0.04 to 13 | General protection |
| Type C | 5 to 10 times | 0.04 to 5 | Small motors, transformers |
| Type D | 10 to 20 times | 0.04 to 3 | Large motors, heavy loads |
| Type K | 10 to 12 times | 0.04 to 5 | Heavy inductive loads |
| Type Z | 2 to 3 times | Instantly | Sensitive equipment |
Trip curves show both thermal and magnetic tripping. The temperature around the breaker can change tripping time, so always check the conditions when you use sample data.
Step-by-Step Walkthrough
Follow these steps to find the tripping time for your circuit breaker:
- Find the fault current in your system. For example, say you measure 60 amps in a circuit with a 20-amp Type C breaker.
- Find 60 amps on the bottom line of the trip curve graph. This is 3 times the rated current.
- Draw a straight line up from this spot until it hits the trip curve band.
- From where the lines meet, draw a straight line to the left to reach the time line.
- Read the tripping time number. For 3 times the rated current, the curve may show a tripping time between 2 and 10 seconds.
- If your fault current is higher, like 200 amps (10 times rated), do the same steps. The tripping time will be much shorter, often less than 0.1 seconds.
- Remember, the trip curve band shows the shortest and longest tripping times. Your real tripping time will be somewhere in this range.
- For very high fault currents, the breaker trips almost right away, only slowed by how fast the parts move.
Always add mechanical clearing and arc stopping times for total clearing time if you want exact results.
By using these steps, you can figure out the tripping time of the circuit breaker for any fault current situation.
Circuit Breaker Selection and Accuracy Tips
Common Mistakes
When you use circuit breaker trip curves, you can make mistakes. These mistakes can affect safety and how well your equipment works. Here are some errors to watch out for:
- You may think a circuit breaker trips at a certain current. But things like how it is made and the environment can change this. Breakers do not always trip at their rated current.
- Trip curves show a range, not a single line. The thermal and magnetic parts inside make a band of possible tripping points.
- If you forget about temperature or humidity, you might read the trip curve wrong. High heat or moisture can change when the breaker trips. It might trip sooner or later than you expect.
- Using a trip curve that is not for your breaker model can give you wrong tripping times.
- Some people forget that real tests show breakers may trip above their rating, but not always at the same value. Sometimes, a breaker will not trip at all below its rated current.
If you get tripping time wrong, you can make arc flash hazards worse. A slow or missed trip can make more energy, which puts people and equipment in danger.
Ensuring Accurate Results
You can make better choices and get more accurate tripping times by following these tips:
- Match the circuit breaker’s electrical features to your system. Check voltage, frequency, interrupting capacity, and continuous current rating.
- Think about the environment. High heat, humidity, or altitude can change how the breaker trips. Put breakers in cool, dry places and use covers if needed.
- Pick the right tripping unit type. Decide if you need instantaneous, short-time delay, or thermal-magnetic units.
- Make sure your breaker works with other devices before and after it. This stops nuisance tripping and makes sure only the right breaker trips during a fault.
- Make sure your breaker is UL tested and set up at the factory. Do regular checks and field tests to keep tripping times correct.
- Use the trip curve from the maker for your breaker model. Do not use a generic curve.
- Check your tripping time calculations. You can use inspection, math, or field tests. Repeat your work to make sure it is right.
| Verification Method | What You Do |
|---|---|
| Inspection | Look for damage or wear on the breaker. |
| Analysis | Use math or computer simulation to check tripping time. |
| Demonstration | Test the breaker in the field to see how it trips. |
| Test | Measure tripping time in a controlled setting. |
Checking and testing often helps you find problems early. This keeps your breaker working well and your system safe.
To figure out the tripping time, follow these steps:
- Find the fault current on the bottom line of the trip curve.
- Draw a straight line up until it touches the curve.
- Draw a line sideways to the time line.
- Look at the tripping time and see the range.
- Think about breaker settings, its shape, and where it is.
Knowing trip curves and breaker features helps you pick the right circuit breaker. It also helps stop false trips and keeps things safe. You can use guides from the maker and special tools like trip analyzers or TCC analyzers for hard calculations. Learning more and practicing will help you get better results and keep your system working well.
FAQ
How do you find the right trip curve for your circuit breaker?
You can check the label on your breaker or look in the manufacturer’s manual. Most companies post trip curves on their websites. Always match the curve to your breaker’s model and rating.
What if your fault current falls between two points on the trip curve?
Estimate the tripping time by finding the spot between the two points. You can use a ruler or straight edge to help. The real tripping time will fall between the two values.
Can temperature affect the tripping time?
Yes, temperature changes can make your breaker trip faster or slower. High temperatures usually cause the breaker to trip sooner. Always check the trip curve notes for temperature details.
Do adjustable settings change how you read the trip curve?
Adjustable settings change the trip curve shape. Before you read the curve, check and record your settings. Use the correct curve for your chosen settings to get an accurate tripping time.
Why should you test your breaker after installation?
Testing helps you make sure the breaker works as expected. You can find problems early and keep your system safe. Use field tests or a trip analyzer for best results.
See also
How to Determine the Correct 1000V DC Circuit Breaker for Your Needs
Explaining the Tripping Curves of Type A, B, C, and D MCB
How to test a circuit breaker with a multimeter
Why choose a customized miniature circuit breaker for your needs
What is the best RCBO installation site for safety

