

Yes, you can safely add a 220V circuit breaker when you follow each step with care. A 220V circuit breaker controls high-power appliances, such as dryers or ovens. Always turn off the main power before you start. If you feel unsure about panel space or wire size, check this table:
| Wire Gauge | Breaker Amps |
|---|---|
| 10 | 30 |
| 8 | 40 |
| 6 | 55 |
Incorrect sizing can cause hazards. If you have doubts, call a licensed electrician.
Key Takeaways
- Always turn off the main power and use a voltage tester before working on your electrical panel to avoid electric shock.
- Use the correct wire size and breaker amperage to match your appliance and follow National Electrical Code guidelines for safety.
- Wear proper safety gear like insulated gloves, safety glasses, and rubber-soled shoes to protect yourself during installation.
- Install the double-pole 220V breaker carefully, secure wires neatly, and double-check all connections before closing the panel.
- Test the new circuit with a voltage tester after installation and call a licensed electrician if you encounter any problems or feel unsure.
220V Circuit Breaker Basics
What Is a 220V Circuit Breaker
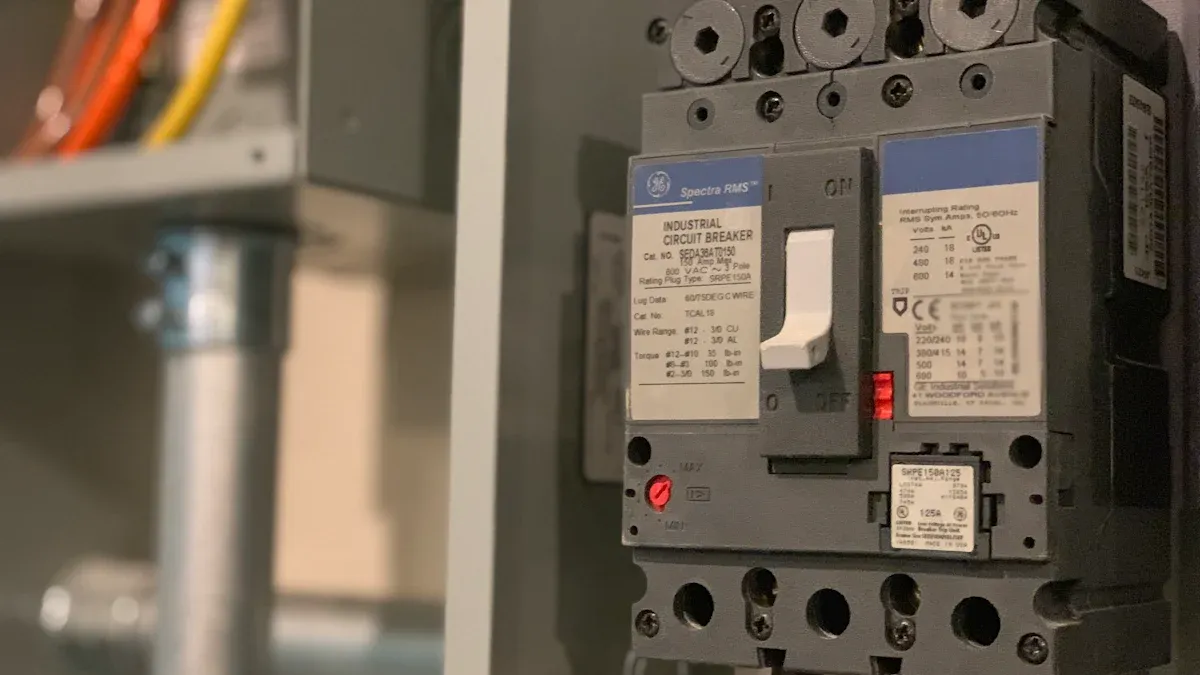
A 220V circuit breaker is a safety device that protects your home’s electrical system from overloads and short circuits. You use this breaker for circuits that need more power than standard 120V outlets can provide. When you install a 220V circuit breaker, you give large appliances like dryers, ovens, and air conditioners the power they need to run safely.
You will find that a 220V circuit breaker has two poles. Each pole connects to a different phase of your electrical panel, which allows the breaker to deliver 220 volts. This type of breaker trips and shuts off power if it senses too much current or a fault. That action helps prevent fires and damage to your appliances.
Several technical factors set a 220V circuit breaker apart from standard breakers:
- Rated voltage matches or exceeds the 220V operating voltage.
- Short-circuit breaking capacity (Icu/Ics) shows the highest fault current the breaker can safely stop.
- Miniature circuit breakers (MCBs) for 220V circuits work well for up to 125 amps in homes and small businesses.
- Environmental factors like temperature and humidity affect how the breaker performs.
- The breaker must meet safety standards such as IEC or UL.
These features make sure your 220V circuit breaker works reliably and safely in your electrical system.
When You Need One
You need a 220V circuit breaker when you plan to install or use appliances that require more power than a regular outlet provides. Common examples include:
- Electric dryers
- Ovens and ranges
- Water heaters
- Central air conditioning units
- Large power tools
If you see that your appliance’s label says “220V” or “240V,” you must use a 220V circuit breaker. Always check the amperage rating on your appliance and match it with the correct breaker size. Using the right breaker keeps your wiring safe and prevents overheating.
Tip: Always check your panel’s capacity before adding a new 220V circuit breaker. If you feel unsure, ask a licensed electrician for help.
Tools and Materials
Before you start working on your electrical panel, you need to gather the right tools and materials. Using the correct items helps you work safely and ensures your new 220V circuit breaker works as it should.
Tools List
You need several basic tools for this project. Each tool helps you complete a specific task with accuracy and safety.
- Flathead screwdriver
- Phillips screwdriver
- Wire stripper
- Needle-nose pliers
- Voltage tester or multimeter
- Tape measure
- Utility knife
- Drill with bits (if you need to make new holes)
- Flashlight or headlamp
Tip: Keep your tools organized and within reach. This helps you avoid mistakes and saves time.
Materials List
Choosing the right materials is important for a safe and reliable installation. The National Electrical Code (NEC) sets strict rules for wire size and breaker ratings. Using the wrong wire or breaker can cause overheating or fire hazards.
| Aspect | Numerical Detail / Explanation |
|---|---|
| Recommended Wire for 20 AMP 2-pole Breaker | 10-3 w/ground wire recommended to allow future load increases and avoid rewiring. |
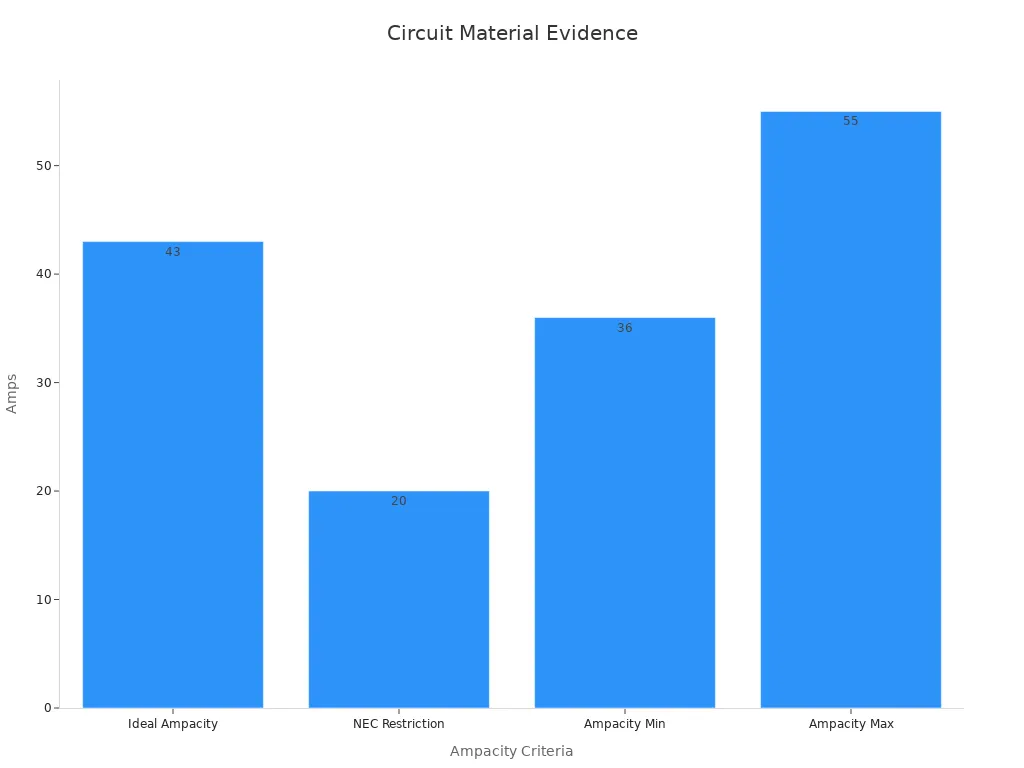
| 12 AWG Copper Wire Ampacity | Actual rating about 43 amps under ideal conditions, but NEC restricts use to 20 amps for safety. |
| NEC Derating Explanation | Wire capacity is derated from ideal ratings due to real-world conditions like heat dissipation and conduit fill. |
| Wire Ampacity Chart Reference | 12 AWG wire can carry 36 to 55 amps depending on insulation and conditions, but NEC limits are more conservative. |
| Safety Margin | NEC standards include large safety margins to prevent overheating and fire hazards, emphasizing oversizing wire. |
You will need these materials:
- Double-pole 220V circuit breaker (match the amperage to your appliance)
- 10-3 or 8-3 NM cable with ground (choose based on breaker size and future needs)
- Cable clamps
- Wire nuts
- Electrical tape
- Panel knockout covers (if needed)
- Grounding wire (if your panel requires it)
Safety Gear
Safety should always come first. You must protect yourself from electrical shock and injury.
- Insulated gloves 🧤
- Safety glasses 👓
- Rubber-soled shoes
- Long-sleeve shirt and pants
- Non-conductive step stool or ladder
Always wear your safety gear before you open the panel. Never skip this step, even if you feel confident.
Safety Steps
Power Off
You must always turn off the main power before you start any electrical work. This step protects you from electric shock and serious injury. Many electrical accidents happen when people skip this step or rush through it. Statistics show that following proper power-off procedures can save lives and prevent injuries. Look at the table below:
| Statistic Description | Data / Insight |
|---|---|
| Reduction in work-related electrical fatalities (1992 to 2010) | Decreased from ~325 to ~160 annually |
| Estimated annual electrical-related fatalities | Approximately 350 per year (~1 fatality per day) |
| Reported electrical injuries (1995-2013) | 63,193 injuries recorded |
| Common cause of non-fatal injuries | Failure to follow lock-out/tag-out procedures most frequent cause |
| Proportion of electrocutions preventable by proper procedures | Over half caused by contact with live equipment, preventable by lock-out/tag-out and de-energizing |
| Main cause of electrical injuries on the job | Shortcuts and failure to follow proper procedures |
Always double-check that the main breaker is off. Use a voltage tester to confirm there is no power before you touch any wires.
Check Panel Capacity
Before you add a new 220V breaker, you need to check if your panel can handle the extra load. Look for open slots in your panel. Count the number of breakers already installed. Check the main breaker’s amperage rating. If your panel is full or close to its limit, do not force another breaker in. Overloading your panel can cause overheating and fire hazards.
- Find the panel’s label for maximum amperage.
- Add up the amperage of all installed breakers.
- Make sure the total does not exceed the main breaker’s rating.
If you feel unsure about your panel’s capacity, contact a licensed electrician for advice.
Personal Protection
You need to wear the right personal protective equipment (PPE) to stay safe during installation. PPE protects you from electrical shock, burns, and other injuries. Regulations require you to use PPE that matches the hazards you may face.
- Wear insulated gloves and safety glasses.
- Use a nonconductive hard hat and arc-rated clothing.
- Choose rubber-soled shoes and hearing protection if needed.
- Make sure your PPE is clean and in good condition.
PPE helps protect your head, eyes, hands, feet, and body from dangers like arc flashes, electric shock, and flying debris. Always select PPE based on the specific risks in your work area. Regularly inspect and maintain your gear to keep it effective.
Never skip PPE, even for quick jobs. Proper protection can prevent serious injuries and save your life.
Installation Steps
Remove Panel Cover
Start by making sure the main power is off. Use a voltage tester to confirm there is no electricity in the panel. Put on your insulated gloves and safety glasses before you begin. Use a screwdriver to remove the screws holding the panel cover in place. Set the screws aside in a safe spot. Carefully lift off the panel cover and place it where it will not get damaged.
⚠️ Safety Tip: Never touch any wires or metal parts inside the panel until you have confirmed the power is off. If you see rust, water, or signs of damage inside the panel, stop and call a licensed electrician.
Prepare Knockout
Find an unused knockout hole on the panel. This is where you will bring in the new cable for your 220V circuit breaker. Use a screwdriver and pliers to gently remove the metal knockout. Make sure the hole is the right size for your cable clamp.
Insert a cable clamp into the knockout hole. Tighten the clamp so it holds firmly. This step keeps the cable secure and protects it from sharp edges.
Note: Removing the correct knockout and using a cable clamp helps prevent wire damage and meets National Electrical Code (NEC) requirements.
Route and Secure Wires
Measure and cut the correct length of cable for your new circuit. Use 10-3 or 8-3 NM cable with a ground wire, depending on your breaker size. Strip the outer jacket and expose the wires. Leave enough length to reach the breaker and grounding bar.
Route the cable through the clamp into the panel. Secure the cable so it does not move or pull out. Organize the wires neatly inside the panel. Use cable clamps or fasteners to keep wires in place and prevent strain on the connections.
| Aspect | Details |
|---|---|
| Wiring Methods | Use conduits, raceways, or cable trays to protect and organize wires. |
| NEC Articles | Articles 300 to 362 cover wiring, securing, and supporting conductors. |
| Securing Conductors | Section 300.11 requires securing and supporting wires to prevent damage. |
| Vertical Raceways Support | Section 300.19 mandates support for wires in vertical runs. |
| Cable Types and Uses | MC cable for durability, NM/NMC for residential, TC for trays, SE/USE for feeders, UF for underground. |
| Conduits and Raceways | Rigid metal conduit (RMC), electrical metallic tubing (EMT), flexible metal conduit (FMC) for protection. |
- Always check circuit diagrams and manufacturer instructions.
- Organize and secure wires to prevent tension or strain.
- Avoid overloading the circuit.
- Label the new circuit for easy identification.
Tip: Neat wiring makes future troubleshooting easier and keeps your panel safe.
Install 220V Circuit Breaker
Choose a double-pole breaker that matches your appliance’s amperage. Double-pole breakers handle both hot wires and disconnect both at once. This design protects you from shock and fire hazards. Insert the breaker into two adjacent slots in the panel. Press down firmly until it snaps into place.
- Use a 2-pole breaker for all 220V circuits to meet NEC safety standards.
- Run 10-3 wire with ground for a 20-amp breaker.
- Avoid nicking the copper wires when stripping insulation.
- Never double-tap unless the breaker allows it.
⚠️ Warning: If the breaker does not fit or feels loose, stop and consult a licensed electrician.
Connect Wires
Connect the black and red wires (hot wires) to the two terminals on the 220V circuit breaker. Tighten the screws securely. Attach the white (neutral) wire to the neutral bar if your circuit requires it. Connect the bare or green (ground) wire to the grounding bar.
A 15 amp motor with a 15 amp breaker plugged into a 30 amp circuit can overheat and cause a fire. This example shows why you must match wire gauge, breaker size, and device rating. Always use the correct wire size for your breaker. For a 30-amp breaker, use #10 AWG wire. For a 40-amp breaker, use #8 AWG wire.
| Parameter | Value / Description |
|---|---|
| Locked Rotor Amps | 105.0 Amps (shows importance of correct breaker sizing) |
| Wire Gauges Mentioned | #6 AWG, #8 AWG, 14 AWG (for different amperage circuits) |
| Circuit Breaker Ratings | 15 Amp, 30 Amp, 40 Amp (shows mismatch risks) |
| Grounding Requirements | Neutral must not be grounded in subpanels; four-wire feed required for safety |
| Voltage Levels | Nominal 120V per hot leg (actual may be lower, e.g., 110V) |
Note: Proper grounding is critical. Use a ground rod with resistance below 25 ohms. Longer rods and correct spacing improve safety. Use #2/0 AWG cable for main grounding to handle high fault currents.
Close Panel
Double-check all connections. Make sure wires are tight and properly placed. Tuck wires neatly to avoid crowding. Replace the panel cover and secure it with screws.
- Confirm the breaker is seated correctly.
- Check for any loose wires or exposed copper.
- Label the new breaker with its purpose.
If you feel unsure about any step, or if your panel looks damaged, call a licensed electrician.
Testing and Final Checks
Restore Power
After you close the panel, you need to restore power. Stand to the side of the panel and wear your safety gear. Turn on the main breaker first. Next, switch on the new 220V circuit breaker. Listen for any strange sounds like buzzing or popping. If you hear anything unusual, turn off the breaker right away and check your work.
⚡ Tip: Always keep your hands dry and use only one hand when flipping breakers. This reduces the risk of shock.
Test Circuit
You must test the new circuit before you use it. Do not trust breaker labels alone. Use a voltage tester to check if the new outlet or appliance receives power. Touch the tester to both hot terminals and the ground. You should see a reading close to 220 volts. If you do not, turn off the breaker and check your connections.
Follow these steps for accurate testing:
- Use a voltage tester to confirm the outlet or appliance is energized.
- Flip the breaker off and test again to make sure power is gone.
- Repeat the process to double-check your results.
- Label the new breaker and outlet clearly.
Testing helps you find mistakes early. It also keeps you and your home safe.
Troubleshoot
If your new 220V circuit breaker does not work, do not worry. Start by checking all wire connections. Make sure each wire is tight and in the correct spot. Use a voltage tester to check for power at each point. Look for tripped breakers or loose wires.
Here is a simple troubleshooting checklist:
| Step | What to Check |
|---|---|
| Breaker does not reset | Check for short circuits or overloads |
| No voltage at outlet | Inspect wire connections and breaker |
| Breaker trips immediately | Look for crossed wires or ground faults |
| Appliance does not run | Confirm correct voltage and wiring |
🛠️ Note: If you cannot find the problem or feel unsure, call a licensed electrician for help.
Testing and double-checking your work ensures your 220V circuit breaker operates safely and reliably. Careful testing prevents future problems and protects your home.
You have learned the key steps to install a 220V circuit breaker safely. Always double-check every connection and use the right materials for your project. Local codes, based on the National Electrical Code, help prevent electrical hazards and keep your home safe.
- Ground all metal boxes properly.
- Never wire a 220V circuit breaker into a standard outlet.
- Use the correct wire size and type.
- Call a licensed electrician if you feel unsure or if your panel is full.
Using a checklist helps you confirm a safe and successful installation every time.
FAQ
Can you install a 220V breaker in any panel?
You can install a 220V breaker in most modern panels. Always check your panel’s label for compatibility. If your panel is old or full, call a licensed electrician for advice.
What size wire do you need for a 220V circuit?
You need to match the wire size to the breaker’s amperage. For a 30-amp breaker, use 10-gauge wire. For a 40-amp breaker, use 8-gauge wire. Always follow the National Electrical Code.
Do you need a permit to add a 220V breaker?
Most cities require a permit for electrical work. You should check with your local building department before starting. Permits help keep your project safe and up to code.
What should you do if the breaker trips after installation?
First, turn off the breaker. Check all wire connections for tightness and correct placement. Look for signs of a short circuit or overload. If you cannot find the problem, contact a licensed electrician.
The following information may be of interest to you
How to Safely Wire a 220V Circuit Breaker Step by Step
How to choose to install a solar inverter
Dual power automatic transfer switch
How to choose wires for your 220V 15 ampere circuit breaker

