
You can safely connect the wiring terminals to a terminal block by following the right steps and using the correct tools. Safety is very important. Always turn off the power and wear safety gear before you touch any terminal block or make connections. In 2025, common terminal block types are barrier strips, feed-through, edge connectors, sectional, power blocks, spring-loaded, ground, fuse, and disconnect terminal blocks. For wiring, use screw terminals, spring-cage, push-in, or insulation-displacement connectors. Getting ready the right way to connect the wiring terminals lowers risks like overheating, bad contact, and electrical problems. Neat wiring with labeled terminal blocks makes fixing things easier and keeps everyone safe.
⚠️ Bad terminal connections cause 30% of electrical failures in factories. This leads to power loss and broken equipment. Careful planning and checking each terminal block connection keeps your system safe.
| Benefit | Explanation |
|---|---|
| Simplified Wiring | Neat terminal block connections help stop mistakes. |
| Enhanced Safety | Insulated terminal blocks lower dangers and problems. |
| Reduced Maintenance Time | Neat terminal connections make repairs and checks faster. |
| Scalability | Modular terminal blocks can grow with your system. |
| Environmental Resilience | Terminal blocks last in tough places for long-term use. |
Key Takeaways
- Always turn off the power first and wear safety gear. This helps you avoid getting shocked when working with terminal blocks.
- Use the right tools and materials, like wire strippers and ferrules. These help you get wires ready for strong and safe connections.
- Label wires and terminal blocks clearly so you do not make mistakes. This also makes repairs easier in the future.
- Put wires all the way into terminal blocks and secure them tightly. Use the right torque or spring pressure to stop loose connections.
- Check each connection by looking at it, giving it a gentle tug, and testing for continuity. This keeps everything safe and reliable.
Safety and Preparation
Power-Off and PPE
Turn off the power before you start any work. Never touch live circuits. This keeps you safe from electric shock. You must wear the right PPE to stay safe. Here is a checklist you should use:
- Put on gloves when you handle wires or terminals.
- Wear safety goggles to keep your eyes safe from sparks.
- Pick insulated tools to stop electrical dangers.
- Make sure your workspace is dry and not messy.
Check if the area follows safety rules. Good grounding helps lower electrical risks. Use ducts, ties, and labels to keep wires neat and safe. Keep related parts together and split high-voltage from low-voltage areas. Leave space for air to move so things do not get too hot. Mark arc flash categories and short circuit current ratings if needed.
⚠️ Tip: Always check again that the power is off before you touch any terminal or wire.
Tools and Materials
Get all your tools and materials before you start. This helps you avoid mistakes and makes things go smoothly. Here is what you need:
- Screwdrivers that fit your terminal block screws
- Wire strippers to take off wire insulation
- Ferrules for stranded wires, especially if you use more than one wire in a terminal
- Crimping tool for ferrules
- Labels or markers for wires and terminals
- Heat shrink tubing or wrap-around tape for labeling
- Insulated pliers and cutters
The right tools and materials make each connection work better. Ferrules help stop problems and make fixing things easier.
Identify Terminal Block Positions
Find the right terminal block spots before you connect wires. Use wiring diagrams and clear labels. Diagrams show each terminal with symbols and labels like “TB1:9.” This means terminal block 1, terminal 9. This system helps you not make wiring mistakes and lets you check your work later.
Label every wire and terminal to match the diagram. Use strong labels, like engraved or heat-shrink types, that do not come off with oil or cleaners. Put labels far enough from the terminals so you can read them before you take things apart. Use numbers instead of just colors. This makes it easy to find problems, even if you do not have a diagram.
| Aspect | Recommendation / Practice | Reason / Benefit |
|---|---|---|
| Marker Types | Use snap-on or engraved markers | Durable and easy to clean |
| Wire Labeling Methods | Heat shrink tubing, wrap-around tape | Labels stay visible and protected |
| Use of Ferrules | Crimped ferrules on wire ends | Improves reliability and eases maintenance |
| Label Placement | Place labels away from terminals | Easier troubleshooting |
| Label Content | Use numbers, not just colors | Simplifies fault finding |
📝 Note: Keeping wires and terminals labeled and neat helps stop mistakes and makes fixing things much easier.
How to Wire a Terminal Block
Strip and Prepare the Wire
Start by getting your wires ready before you use a terminal block. Getting wires ready helps make a safe and strong connection. Pick the right wire stripper for your wire’s size and type. Pull-type wire strippers work for most wires from 10 AWG to 22 AWG. Put the wire in the right notch, close the jaws, press, and pull off the cover. For VA and VVF wires, use jaw-type strippers. Squeeze the handles to cut and pull off the cover in one step. Thick wires need engineer pull-type strippers with sharp blades. For coaxial cables, use coaxial cable strippers. These tools take off layers without hurting the inside wire.
Here is a table to help you choose the best tool and way to strip wires:
| Wire Gauge Range | Recommended Tool Type | Key Technique Details |
|---|---|---|
| 10 AWG to 22 AWG | Pull-type wire strippers | Use the correct notch matching the wire gauge; close jaws, press, and pull insulation. |
| VA and VVF wires (1.5mm to 2mm thick) | Jaw-type wire strippers | Place wire between jaws, compress handles to cut and pull insulation in one motion. |
| Thick wires (0.8mm to 2.5mm) | Engineer pull-type wire stripper | Sharp, corrosion-resistant blade suitable for solid and stranded wires. |
| Coaxial cables | Coaxial cable strippers | Strip multiple layers (outer insulation, shield, inner conductor) to specified lengths. |
Follow these steps for the best results:
- For big wires, use coaxial cutters or a cable knife. Cut the cover but do not cut the wire strands, then pull it off.
- For wires with many conductors, use adjustable strippers. Cut the cover from different sides to take it off.
- For flat wires, cut between the strands and use a knife to remove the cover.
- Strip about 1 inch of cover, or match the length to the terminal barrel.
- Practice on extra wire so you do not hurt the wire.
🛠️ Tip: Always use the right notch for your wire size on the wire stripper. This keeps the wire strong and ready for the terminal block.
Use Ferrules for Stranded Wire
When you use stranded wire in a terminal block, you should use ferrules. Ferrules are small metal tubes that go on the ends of stranded wires. You crimp them on to keep the strands together and make the connection safer. Bare stranded wire can come apart, break, or rust after you strip it. This can make wires get too hot or cause short circuits. Ferrules make the end of the wire strong like solid wire. They make it easier to install and help stop problems that cost money.
Ferrules have many good points:
- They stop wire strands from coming apart.
- They make things safer by keeping strands together.
- They give a good spot for connecting wires.
- They let you safely put more than one wire in a terminal.
- They work with many wire sizes and jobs.
- They help your work last longer and stop future problems.
- They make the electrical connection better.
- They make it easier to put wires in terminal blocks.
- They make wires last longer and safer by covering bare wire.
Ferrules also help stop rust and keep wires working well for a long time. Always use the right tool to crimp ferrules. This makes sure all the wire strands help carry electricity and makes wiring a terminal block easier.
⚡ Note: Ferrules make terminal block wiring safer and better, especially where things shake or move.
Insert and Secure the Wire
After you get your wires ready and strip them, you need to put them in the terminal block and secure them. The way you do this depends on if you use solid or stranded wire. Solid wire is easy to handle and put in. You do not have to worry about the wire coming apart. Stranded wire needs more care. Twist the strands tight before you put them in. Use ferrules for the best results. Do not solder or tin the whole end of the wire. Only tin the tip if you need to stop it from coming apart.
Here is a table that shows the best ways to put in and secure wires:
| Wire Type | Recommended Insertion and Securing Methods | Key Points |
|---|---|---|
| Stranded | – Twist strands tightly before insertion. | – Prevents strand breakage and ensures reliable contact. |
| – Use ferrules crimped with proper tools on bare copper tips. | – Prevents loose strands and ensures full gauge conductor contact. | |
| – Avoid soldering or tinning the entire wire end. | – Soldering damages insulation and causes oxidation, reducing connection reliability. | |
| – Strip longer than terminal depth, bend wire back over insulation, wrap around insulation, then clamp. | – Provides strain relief by clamping both conductor and insulation. | |
| – Use spring clamp terminal blocks or Wago connectors for better securing. | – Recommended for fine stranded wires to improve connection stability. | |
| Solid | – Easier to handle and insert; less concern about fraying. | – Preferred for track feeders and simpler terminations. |
| Both | – Ensure correct torque or clamping pressure to achieve air-tight contact without damaging wire. | – Prevents loose connections and potential failures. |
| Strain Relief | – Use shrink tubing over thin wires before crimping, then shrink over connector shank. | – Provides mechanical support and reduces stress on the conductor. |
| – Additional cable clamps or molded jackets recommended if vibration or movement is expected. | – Protects against wire breakage due to mechanical stress. |
- Do not solder stranded wire before putting it in. It makes hard spots and can cause problems later.
- Solid wire is good for simple jobs.
- Stranded wire bends easily and does not break as fast, so it is good for bus wiring.
- Strain relief is important for fine stranded wires. Use shrink tubing or cable clamps if needed.
- Wago 221 connectors hold stranded wires tight.
- Twisting stranded wire before putting it in makes the connection better.
- Use the right crimping tool for ferrules.
When you wire a terminal block, always check that the wire is tight in the terminal. Tighten the screw or clamp to the right tightness. Do not make it too tight, or you could break the wire or terminal. Make sure the cover does not go into the terminal block. Only bare wire or ferrule should touch the metal part. Good wiring helps you avoid loose wires and keeps your terminal block safe.
✅ Tip: After you connect wires, gently pull each one to see if it is tight. This easy test helps you find weak wires before you finish wiring a terminal block.
Connect the Wiring Terminals to Terminal Blocks
You need to connect the wiring terminals to the right terminal block for a safe and reliable system. Each type of terminal block uses a different method. You must follow the correct steps for each one. This helps you avoid mistakes and keeps your wiring organized.
Connect Wire to Screw Terminal Block
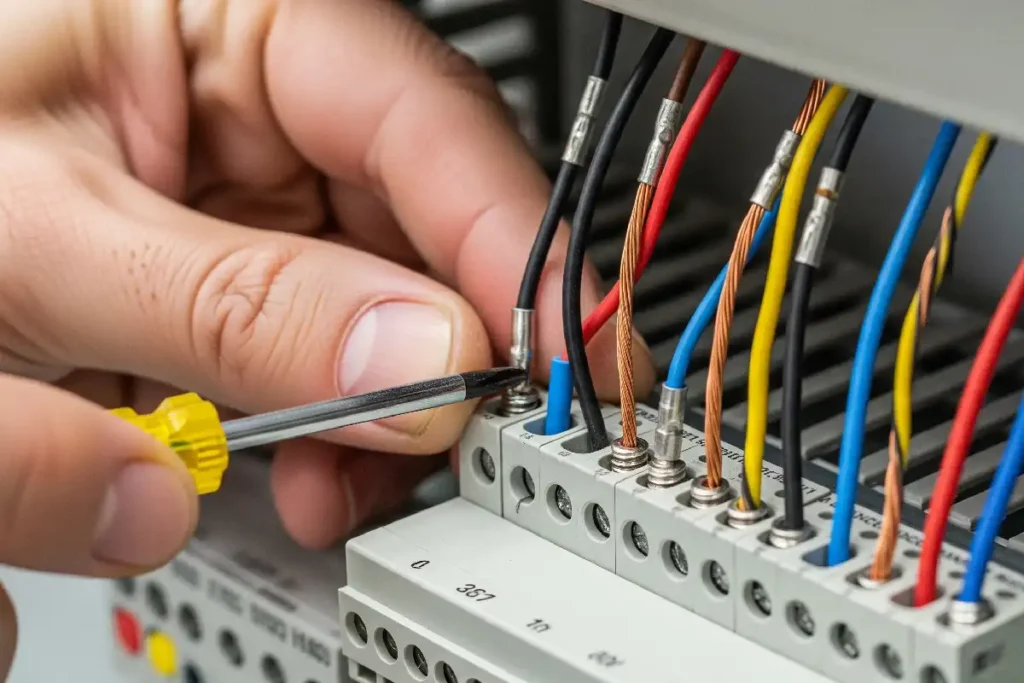
Screw terminal blocks are common in many electrical panels. You use a screw to hold the wire in place. To connect the wiring terminals, follow these steps:
- Choose the correct terminal block for your wire size and current needs.
- Strip the wire to the right length. Make sure no insulation is left under the screw.
- If you use stranded wire, crimp a ferrule on the end. This keeps the strands together.
- Loosen the screw on the terminal. Insert the wire or ferrule fully into the opening.
- Tighten the screw to secure the connection. Use a calibrated torque tool. The National Electrical Code (NEC) 110.14(D) says you must use the torque value from the manufacturer. This prevents over-tightening or under-tightening.
- Check the connection by gently pulling the wire. The wire should not move.
- Repeat for each terminal you need to connect.
🛠️ Tip: Always use a quality torque tool. This helps you screw a wire to a terminal with the right force. Over-tightening can crack the terminal block or strip the threads. Under-tightening can cause loose connections, arcing, or even fires.
| Step | Action |
|---|---|
| 1. Select | Pick the right terminal block for your wire and current. |
| 2. Prepare | Strip wire and add ferrule if needed. |
| 3. Insert | Place wire or ferrule into terminal. |
| 4. Tighten | Screw a wire to a terminal using the correct torque. |
| 5. Test | Tug wire gently to check the connection. |
You must always follow the manufacturer’s instructions for torque. This keeps your terminal block safe and your wiring reliable.
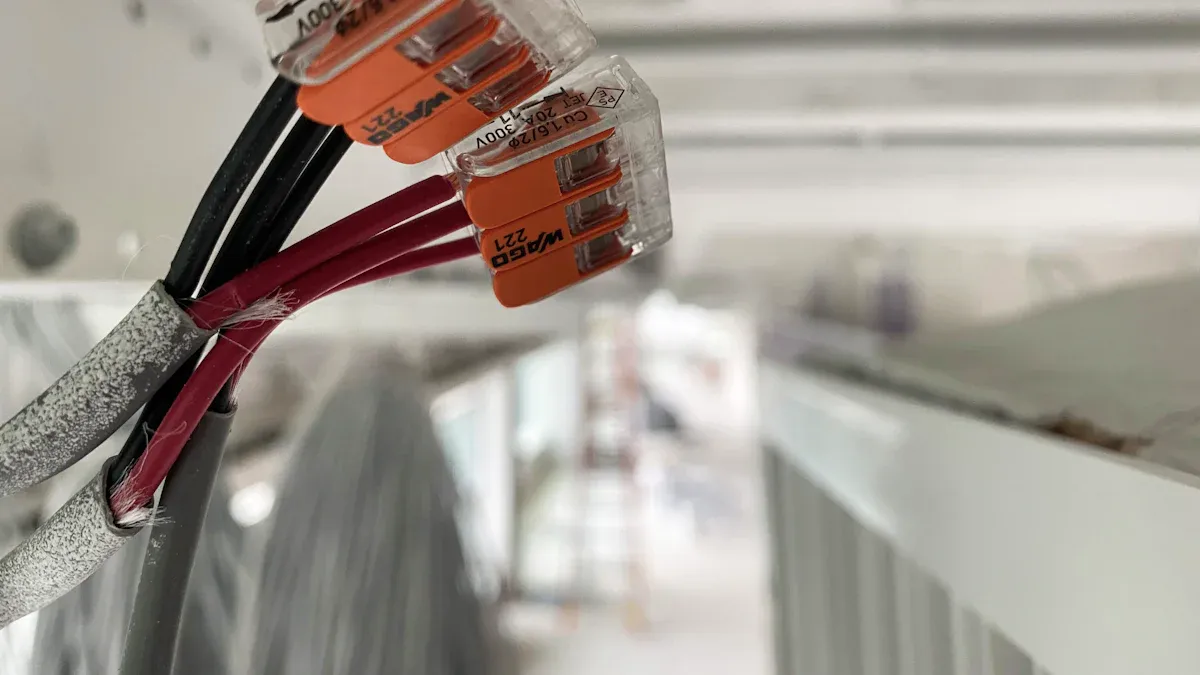
Connect to Spring Clamp Terminal Block
Spring clamp terminal blocks use a spring to hold the wire. You do not need to screw a wire to a terminal here. This type is fast and works well for both solid and stranded wires. To connect the wiring terminals, use these steps:
- Identify the positive (+) and negative (-) terminals on the block.
- Strip the insulation from the wire ends.
- Press the spring lever or button to open the clamp.
- Insert the stripped wire or ferrule into the terminal opening.
- Release the lever. The spring clamps down and holds the wire tight.
- Repeat for each terminal you need to connect.
- Double-check that each wire is secure by giving it a gentle tug.
- Cover each connection with heat shrink tubing or tape for extra safety.
⚡ Note: Spring clamp terminal blocks keep a steady grip on the wire, even if the panel shakes or moves. This makes them a good choice for places with vibration.
Spring clamp terminals help you connect the wiring terminals quickly. You do not need to worry about torque. The spring keeps the pressure right. Always check that the wire is fully inserted and no bare strands are showing.
Connect to Push-In Terminal Block
Push-in terminal blocks let you connect the wiring terminals by pushing the wire straight into the terminal. This method is fast and does not need tools for installation. Here is how you connect wire to plug-in terminal block:
- Make sure you use the right wire type and gauge. Most push-in terminals work best with solid wires or ferrule-tipped stranded wires.
- Strip the wire to the length shown by the terminal block.
- Push the wire straight into the terminal hole until it stops.
- Check that the wire is secure by pulling gently.
- Repeat for each terminal you need to connect.
🚩 Warning: Do not use wires that are too large for the terminal. Push-in terminals often only fit certain gauges, like 14 gauge. Forcing a bigger wire can cause a bad connection.
Common mistakes with push-in terminal blocks include damaging the wire during insertion, using the wrong wire size, or not inserting the wire fully. If you use stranded wire, always use a ferrule. Do not jam bare stranded wire into a push-in terminal. This can leave strands out and cause hot spots or failures.
| Mistake to Avoid | Why It Matters |
|---|---|
| Using wrong wire gauge | Can cause loose or unsafe connection |
| Not inserting wire fully | May lead to overheating or poor contact |
| Forcing stranded wire without ferrule | Strands may not all connect, causing failure |
| Relying on push-in for frequent changes | Push-in terminals are not easy to rework or modify |
Push-in terminals give a strong hold and are good for long-term reliability. They are quick to use, but you must check each connection carefully. Always follow the manufacturer’s instructions for your terminal block.
📝 Best Practice: After you connect the wiring terminals, label each terminal and wire. This helps you find problems later and keeps your wiring organized.
Proper Terminal Block Connection Checks
When you finish wiring, you must check each terminal block. This makes sure your system works well and stays safe. There are three main ways to check: visual inspection, tug test, and continuity testing. These steps help you find problems early and keep every terminal secure.
Visual Inspection
First, look closely at each terminal block. Check for loose wires or bent pins. See if there is rust or corrosion. Make sure the wire cover does not go under the clamp or screw. Look for cracks or melted plastic near the terminal block. If you see damage, change the terminal or connector right away. Use a magnifying glass to see small things. Clean the terminal with contact cleaner and a soft brush to get rid of dust or rust.
🔍 Tip: Bad wire stripping, wrong installation, and shaking can make wires loose. Always get wires ready the right way and tighten screws or clamps.
| Problem Sign | What to Do |
|---|---|
| Bent pins | Straighten or replace |
| Corrosion | Clean with contact cleaner |
| Loose fit | Re-seat or tighten connection |
| Melted plastic | Replace terminal block |
Tug Test
After you look at the terminals, do a tug test. Hold the wire close to the terminal and pull gently. If the wire moves or comes out, it is not tight. The tug test helps you find loose wires before you turn on the power. This easy step can stop problems and keep your terminal block safe. Always pull softly so you do not break the wire or terminal.
The tug test is a good way to find loose wires. It works well for a first check, but you should also use electrical testing to be sure.
Continuity Testing
You should always use a continuity tester or multimeter to check terminal block connections. This test shows if electricity can move through each terminal without stopping. Follow these steps:
1. Turn off the power before you start. 2. Test your continuity tester by touching the leads together. Listen for a beep or look for zero resistance. 3. Put one lead on the hot terminal, usually marked with a brass screw. 4. Put the other lead on the next terminal you want to check. 5. Listen for a beep or look for zero resistance. This means the connection is good. 6. For switches, flip them and watch for changes in the tester. 7. If you test protective wires, connect the line and earth wires for a short time. 8. Use the ohmmeter to measure resistance between line and earth terminals. 9. Write down the highest resistance you see. 10. Look for problems and flip through all switch positions.
If you find a break or high resistance, look for loose wires, bad stripping, or damage. Tighten screws, clean terminals, or change broken parts. Always check the connection before you turn the power back on.
⚡ Note: Checking with a continuity tester and looking at your terminals often helps stop future problems and keeps your terminal block connections working well.
You can connect wiring terminals safely if you use simple steps. First, pick the right terminal and wire for your job. Next, strip the wires and get them ready. Then, put the wires all the way into the terminal. Make sure to secure them the right way. After that, check each connection by looking at it, pulling on it, and testing it with a meter. Always do what the manufacturer and local rules say to stay safe. If you have questions or tips, share them in the comments to help others.
FAQ
What should I do if a wire keeps slipping out of the terminal block?
Check if you stripped the wire to the correct length. Use a ferrule for stranded wire. Make sure you insert the wire fully and tighten the screw or clamp. If the problem continues, replace the terminal block.
Can I mix solid and stranded wires in the same terminal block?
You can connect both types, but use ferrules for stranded wires. Always follow the terminal block manufacturer’s instructions. Mixing wires without ferrules can cause loose connections or overheating.
How often should I check terminal block connections?
Inspect connections every six months in most environments. In places with vibration or dust, check more often. Look for loose wires, corrosion, or signs of heat damage.
What is the best way to label wires for terminal blocks?
Use heat shrink tubing or engraved markers. Place labels close to, but not touching, the terminal. Clear labels help you find and fix problems faster.
Is it safe to reuse terminal blocks after removing wires?
You can reuse terminal blocks if they show no damage, corrosion, or wear. Always inspect the clamp or screw. Replace the block if you see cracks or loose parts.
See also
What Is a Terminal Block and How Does It Work
What You Should Know About Terminal Blocks and Their Other Names
How many types of wiring terminals are there?
How to determine if the charger has surge protection function
Step by Step Guide to Installing Miniature Circuit Breakers

